Version 2.0 – HTML emails
FixMyStreet sends a number of automated emails, both to users (confirmation emails, follow-up questionnaires) and to bodies (the reports themselves). Previously these were plain text, but we have now introduced HTML emails, with all the design possibilities that this implies.
One reason for this is to make the site’s communications look more professional; another is an attempt to minimise one of the most time-consuming admin tasks - dealing with users who reply to our automated emails.
Designing better emails
In Version 2.0 we wanted to afford FixMyStreet emails the same design and usability attention that we normally spend on the FixMyStreet website.
Incorporating feedback from our users, our support team, and our council partners, we quickly identified a few key places that HTML (graphical) emails could improve the FixMyStreet experience for everyone:
- Attaching a map and photo of each problem to our “Has your problem been fixed?” questionnaire email, to help people remember the report we’re asking about.
- Styling calls to action as attractive, clickable buttons, to make the emails easier to quickly scan and comprehend, and to reduce user support queries.
- Using photos and a clearer typographical hierarchy to make the area alert emails easier to scan, especially when there are multiple new problems in your chosen area.
- Letting our council partners and international reusers maintain their brand image across the website and emails, by easily customising the logo and colour scheme of emails sent to their users.
The best way to see how we’ve improved FixMyStreet’s emails is to give FixMyStreet a try, and receive the emails yourself! Try reporting a new problem near you, or subscribing to email alerts about new reports in your area.
If you’d like to know how we implemented some of our more technical changes, read on…
Attaching the static map image
One thing that we wanted to include in the email was a map showing the location of the report (be that the one you’ve just made, or the one you’re receiving an alert or questionnaire for). The map that you see on the website is made up of many 256x256px tiles stitched together in HTML/CSS to appear as one smooth map, with separate pin images superimposed in the correct location; for the email, we needed just one image covering whatever portion of the map was necessary, plus the pin.
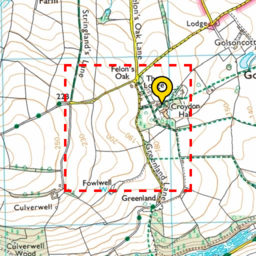
This is the point at which FixMyStreet’s progressively-enhanced base came in very useful. If JavaScript does not work for whatever reason, the site has always displayed an alternative: a small map made up of four tiles in a square, with the pin located appropriately on top. It also makes sure that the pin location (the point at the bottom middle of the pin) is contained within the central half of the tiled map (the red dashed area in our image here), so that there’s no chance the pin overlaps the edge of the map.
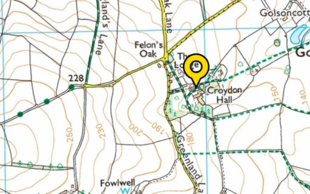
This was perfect for the image to be used in an HTML email. The new static map function fetches the same data used by the front end, requests the tile data for those four tiles, stitches them together in one 512x512px image, composites the pin on top in the correct location, and then cuts off the bottom 128 and top 64 pixels – as the pin’s central location means those will always be pin-less. The image is then shrunk to 310px in width, providing output that looks like this, appearing in the top right hand corner of the email:
Inline images
The new HTML email - whether they’re reports, alerts, confirmations or questionnaires - normally have upwards of three images: the static map image, an image of the report (or repots for alert emails), and a site logo. We wanted to include all these images within the email itself, rather than use remote images, as due to spam many people have remote images switched off.
We also wanted to keep things as simple as possible when including images in
the email templates. Inline images in HTML emails use an image source of
cid:UNIQUE_ID within the HTML (or CSS), and then give a particular attachment
of the email the same UNIQUE_ID in its Content-ID header. Lastly, we may
potentially also have normal attachments.
We settled on an inline_image function in the template, which can be
provided with either a path to an image file (for the static logo), or a
function that returns image data and a content type (for the static map or
report image). As the email template is processed, each call to this function
generates a unique ID for the image and stores the information in a list to be
added after the plain text/HTML email parts.
There are a variety of ways to attach images to an email. Content types
are used to identify what is contained by each part of the email. As well as
the various types of image, and text/plain and text/html for the text and HTML
parts, there are various containers: multipart/alternative as a container for
parts containing the same information in different formats, multipart/related
as a container for parts that are linked in some way, and multipart/mixed as
a general container.
The setups we decided on were as follows:
-
If the HTML email has no inline images or other attachments, then we create a
multipart/alternativeemail, containing the two textual parts. -
If the HTML email has inline images but no other attachments (the most common case), we create a
multipart/relatedemail, its first part being themultipart/alternativeas above, the subsequent parts the inline images.An alternative here would be to create a
multipart/alternativeemail, with its first part being text, and its second part beingmultipart/relatedcontaining the HTML part and the inline images. This would mean that an email client that didn’t support HTML email might only see the textual part and not any of the images. If your inline images were not ‘important’ to the email (e.g. an email footer signature) then this might be a way to go; we thought that the map and image should be visible to all users if possible. -
If the HTML email has attachments but no inline images, we create a
multipart/mixedemail, its first part being themultipart/alternativeas above, the subsequent parts the attachments. -
If the HTML email has both inline images and other attachments, then we create a
multipart/mixedemail. Its first part is amultipart/relatedemail (that again containsmultipart/alternativeand the inline images), and then its other attachments form the later parts of the mixed email. If you imagine the parts as envelopes with brackets, it would look like this:multipart/mixed ( multipart/related ( multipart/alternative ( text/plain text/html ) image/jpeg image/png ) application/pdf )
As part of this work, I discovered that the oldest open
GitHub issue of the Rails
framework was related to this topic – if you used Rails to create an email
containing both inline images and normal attachments, the normal attachments
were not accessible to most email clients (that support HTML email) as they had
embedded all the normal attachments inside a multipart/related part. I have
submitted a pull request to fix
this structure, which I hope will be accepted in some way.
Templating
This work was also a good opportunity to move some text generation out of some code into the templates (necessary because the text being generated now needed some HTML around each entry), for all the alert emails.
Testing
Finally, this post wouldn’t be complete without a few words about email testing.
Any of you who have built HTML emails in the past will agree that they are like taking a time machine back to web development in the mid 1990s. Email clients like Outlook, Gmail, and iOS Mail have dramatically different capabilities and ways of rendering the same email code.
One way of avoiding cross-client complications is to keep your HTML layout as
simple as possible; maybe add an <img> tag in for your site logo, some
<strong> or <em> tags for emphasis, and call it a day.
But our plans for FixMyStreet required much more complex email layouts than this. It was a hard requirement that the details of the report (the map, the name, the photo) in our questionnaire emails, were given equal priority to the introductory text and the call to action buttons. The requirements led us to a two-column layout, which, inevitably, required two or three layers of nested table cells. (Remember, we’re in our 1990s time machine!)
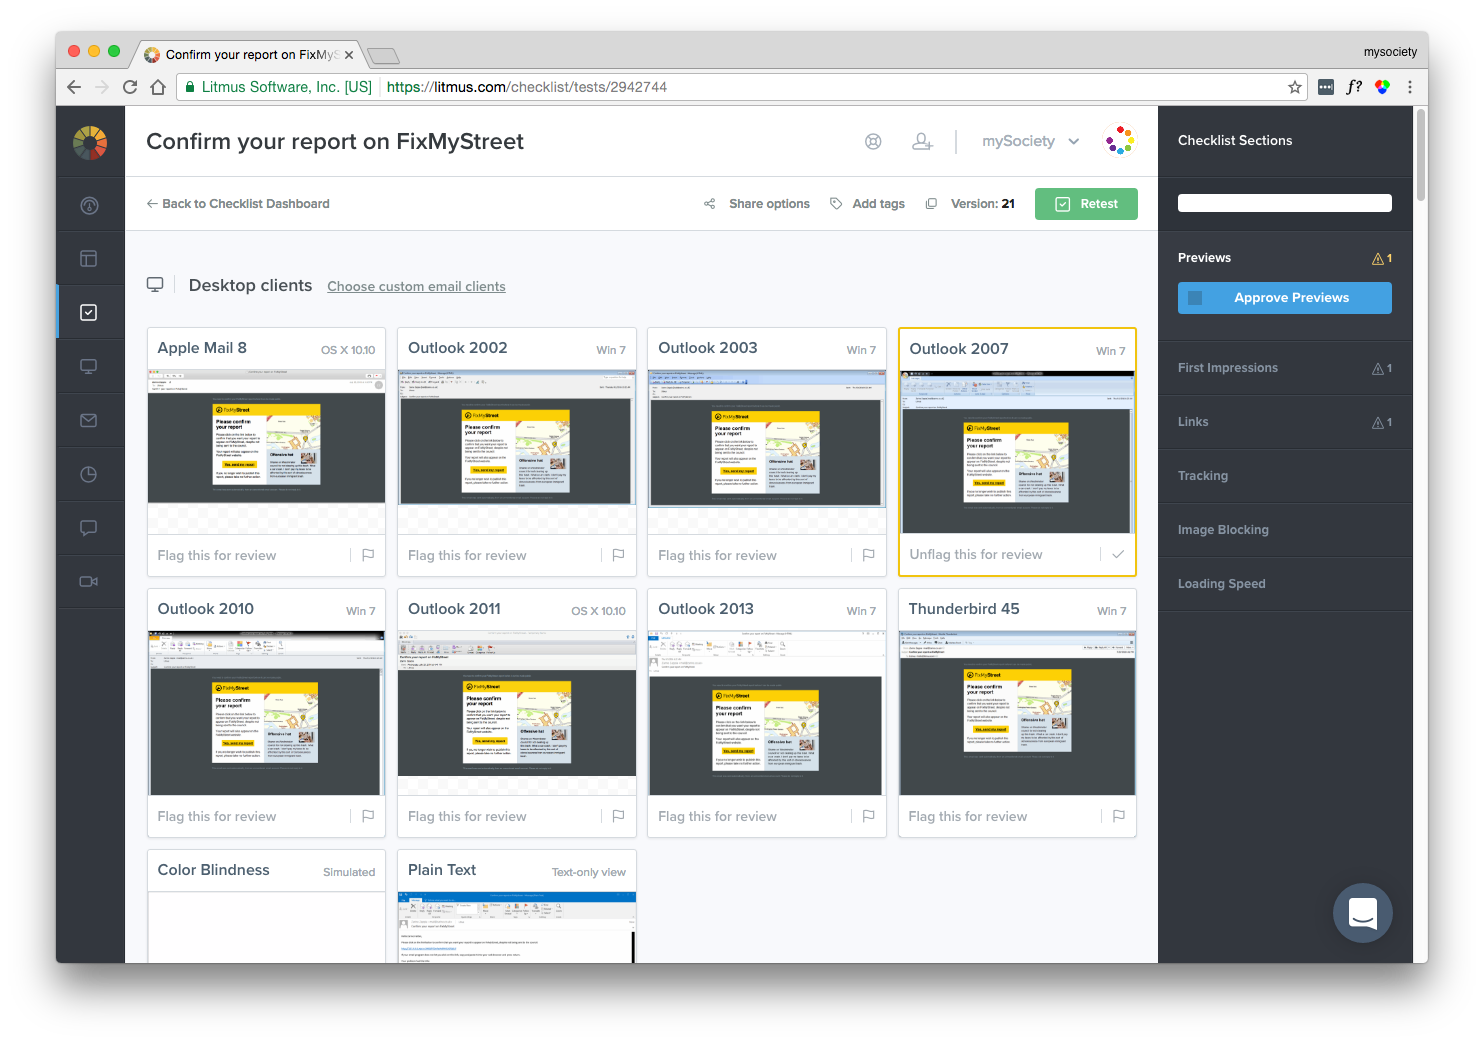
To help us test these layout changes in all the required email clients, we used Litmus, which is like Browserstack but for emails. You send a single email to Litmus, and it renders that email in dozens of different email clients, grabbing screenshots of each one, and presenting them to you in a handy dashboard. Building HTML emails this way still requires a good deal of trial and error, and obscure CSS knowledge, but at least with Litmus, the process of iterating on your design is made as short and fast as possible. It’s an expensive service, but well worth the cost for the peace of mind that your new layout works in even the most uncooperative email clients.
With the help of our Litmus checklists, we made a bunch of unintuitive discoveries, including:
- Using
<th>rather than<td>elements, so that the Android 4.x mail client can give themblockstyling in the small screen media query. - Defining our font settings on every table cell, rather than simply inheriting
font-familyfrom thebody, so that sans-serif fonts are used in Outlook, rather than Times New Roman. - Using a three-column wrapper table to create a 620px centred content area that also shrinks down on narrow screens. (Outlook doesn’t like max-width, so this is the simplest alternative.)
- Enforcing a sensible (500px) min-width for the main content area, on clients that don’t support media queries.
- Using giant borders on
<a>elements, to make them into Outlook-friendly buttons without resorting to less accessible alternatives like images. - Aligning images with the deprecated
alignattribute, rather than CSS floats. - Applying the email background colour to a wrapper element inside the
body, and thus leaving thebodyto keep its default white background, so that replies sent from Outlook (which inserts the reply message inside the body of the original message) will have a white background.
If you have any questions, or problems installing the code, please do get in touch, or post on our mailing list.