Staff users in FixMyStreet
Privileged accounts with access to management features.
Staff users are a middle rung of account, inbetween normal users of the site and superusers with full access to everything. They are associated with a particular body, and can have access to different features, depending upon the permissions or roles granted to them. All their abilities only apply to reports made to the body with which they are associated; all staff users have access to all report states, not just open/fixed.
Navigating FixMyStreet Pro as a staff user

If your Administrator has already given you staff permissions, you will see an additional ‘Admin’ button on the top menu when you’re logged in. If not, your access may be only in the frontend (e.g. moderation does not require any backend admin access), or your Administrator can add these permissions at any time: see ‘Creating a Staff Account’.
Viewing all reports in your area
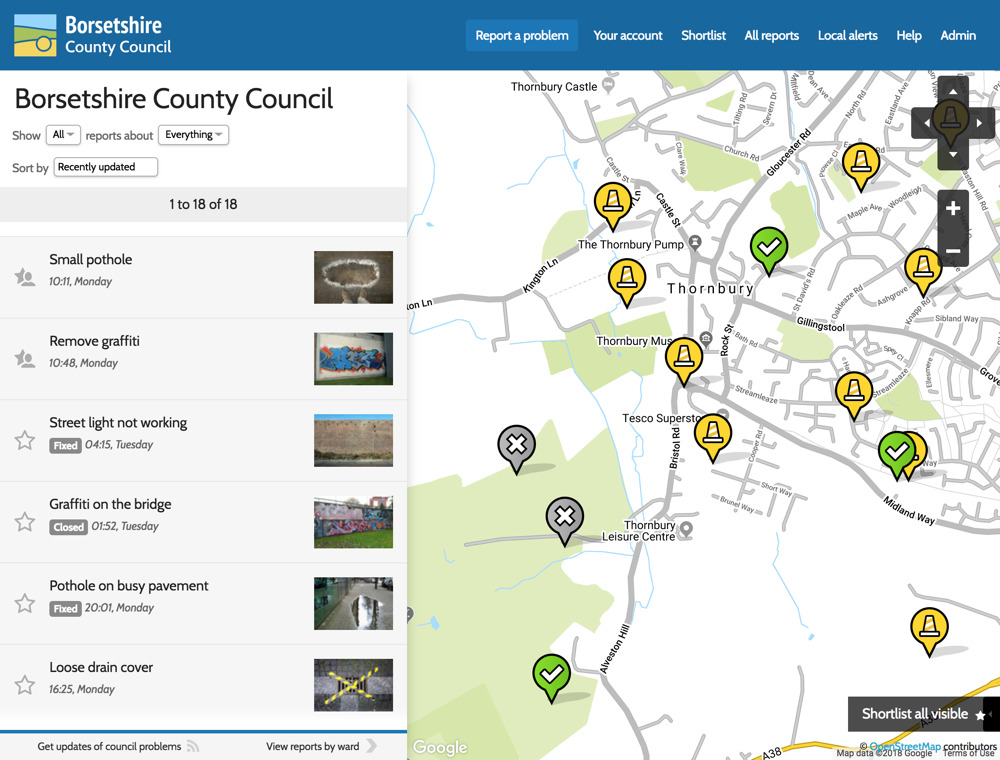
If you want to view everything that’s been reported within your authority’s boundary, click on ‘All reports’ in the top menu. You’ll see the boundaries of your authority area on the map, and a list of all reports, with the most recently updated reports at the top, in the left hand panel.
Note: staff members can be allocated one or more category (eg potholes, streetlights, etc) by an Administrator — see ‘Creating a Staff Account’ for more details. When logged in, these staff members will only see reports within those categories by default.
Defining the area of interest
If required, you can use the controls to the right of the screen to zoom in or out, or pan across the map. As you’ll see, the list of reports and URL (web address) always reflect the area you are viewing on the map, so this is another way of refining your view.
Once you’ve found a satisfactory view, and if you are likely to want to revisit it, you can bookmark or otherwise take a copy of the URL displayed in your browser, so you don’t have to define the location again in the future.
Viewing reports in a specific area
If you already know the street name or postcode of the location you’d like to view, you may find it quicker to use the search form on the front page. This will load the map at that location, along with a list of reports made there.
Filtering and sorting reports
From the ‘All reports’ page, or after narrowing down on a specific area, you have the ability to filter reports using the drop-downs at the top of the left panel.

You can filter by state (eg ‘Fixed’ or ‘In progress’) and category (eg Potholes or Graffiti). You may also sort them by date created, how recently they have been updated, or number of updates.
All categories, or all subcategories within a parent category, can be viewed via a toggle, making it easier and quicker to navigate to the reports in which you are interested.
Let’s say, for example, you want to view on the map all reports relating to parks maintenance issues, such as full litter bins, fly-tipping and path cleaning. Instead of having to manually select the relevant categories, you can instead select the parent category ‘Parks maintenance’ and all associated categories will be toggled. Once you’re done, click the parent category again to deselect all associated categories.
Equally, if you want to view reports from all available categories, you can click ‘Everything’ at the top of the list to select all categories, and click again to deselect them all.
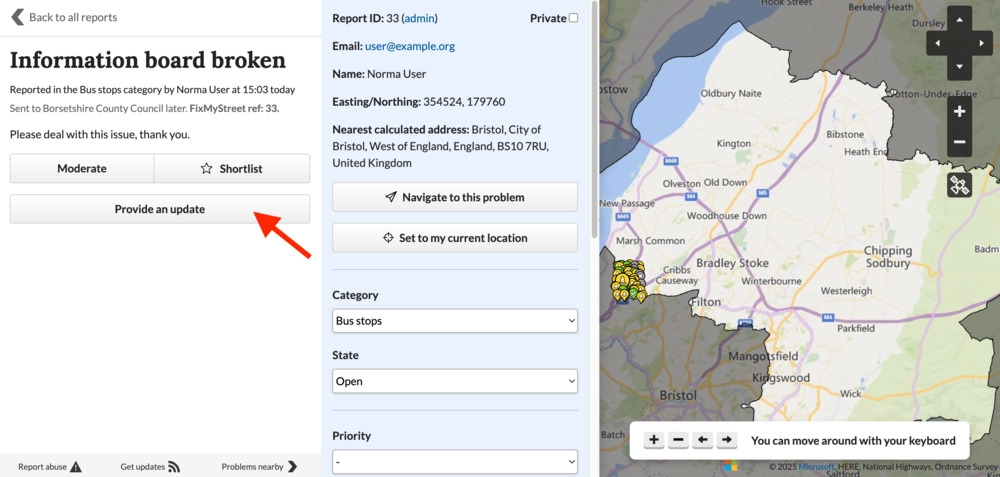
Viewing a single report
To view an individual report, click on one of the issues in the list, or on a map pin, to view the full report.
Note: if you need to moderate or hide a report, see ‘Dealing with undesirable content‘ below.
Searching for a report
Click on ‘Admin’ in the top menu bar.

You’ll be taken to an admin summary page for your FixMyStreet Pro instance, from which you can search for reports.
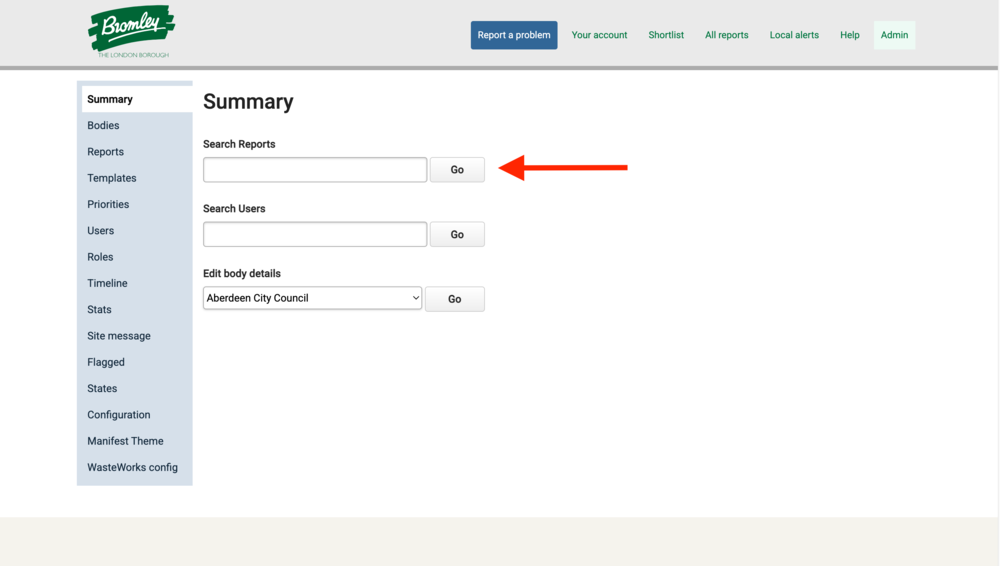
Using the ‘Search Reports’ box, you can:
- Enter any word contained in the required report’s title or body
- Search by the report-maker’s name (or part of the name), their email address or phone number (where given).
- Search by the report’s ID number if it’s known. Putting ‘id:’ directly before this number in the search box will speed up the return of results.
- Search by an ID number used within an integrated backend system. Prefix your search with “ref:” followed by the external ID. Note: this may depend on the system/set up of the integration.
The search will return a list of all reports that fulfil your parameters.
Depending upon the staff user’s permissions, you can then either click on the report’s ID number to open the report in a new browser window and access the moderation/ editing/ inspection facilities there; or click on the word ‘Edit’ to access the full report admin editing page.
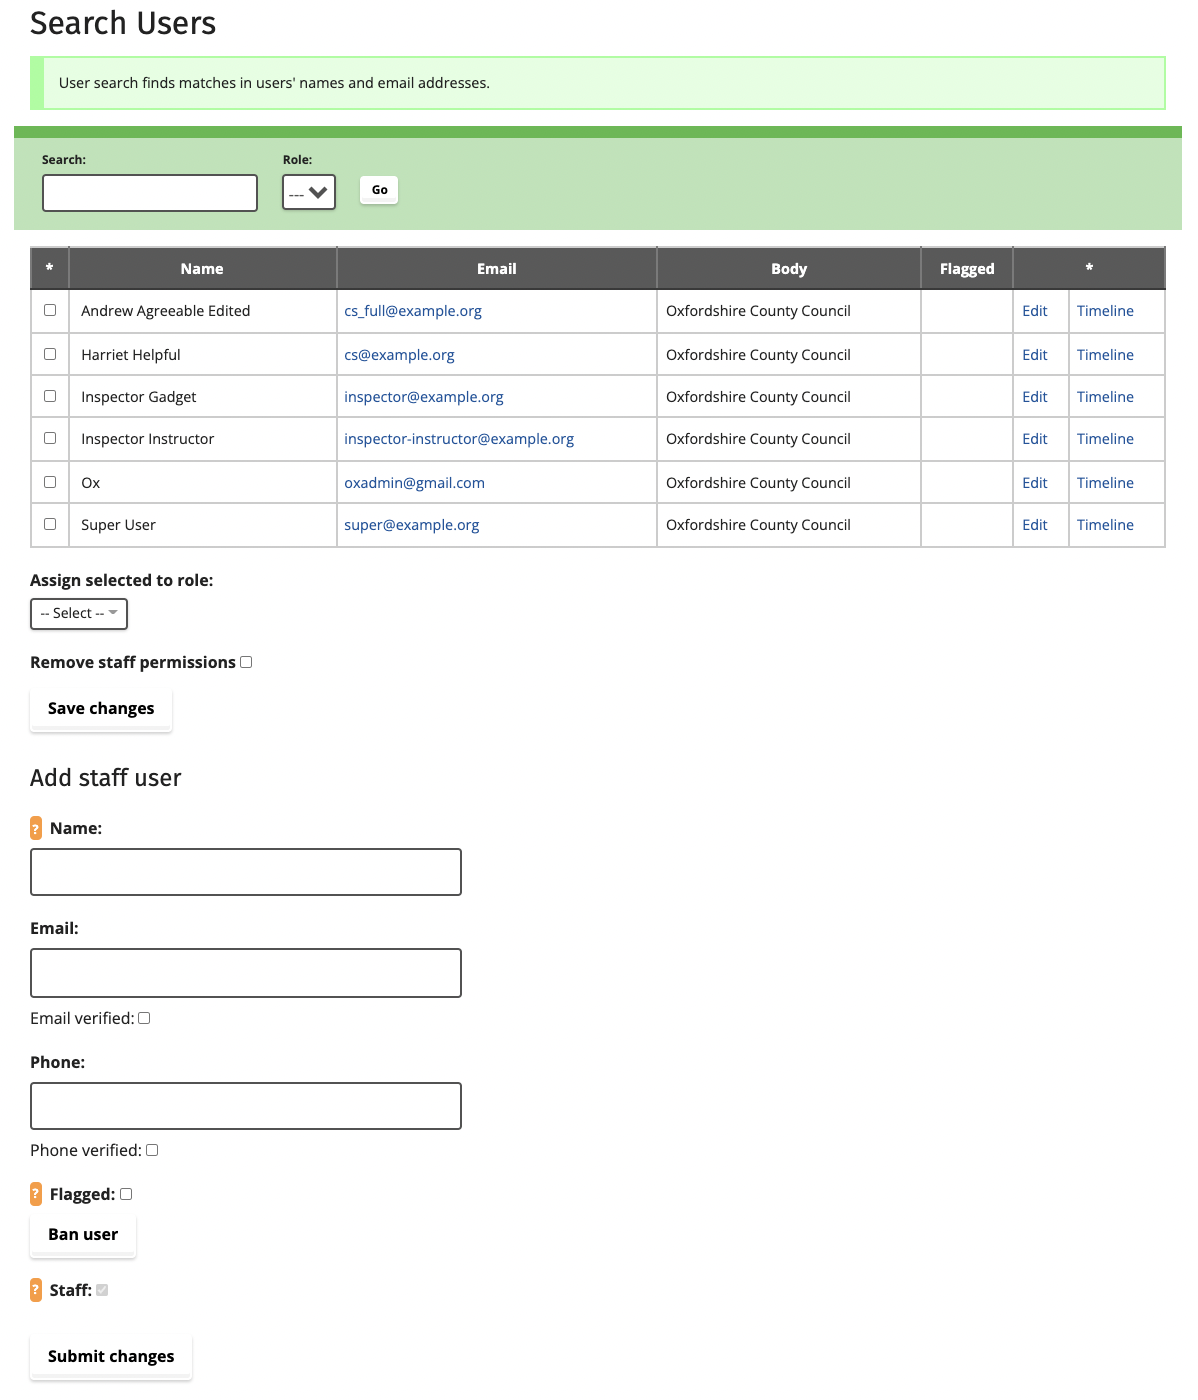
Searching for a user
Click on ‘Admin’ in the top menu bar.
You’ll be taken to an admin summary page for your FixMyStreet Pro instance, from which you can search for users.
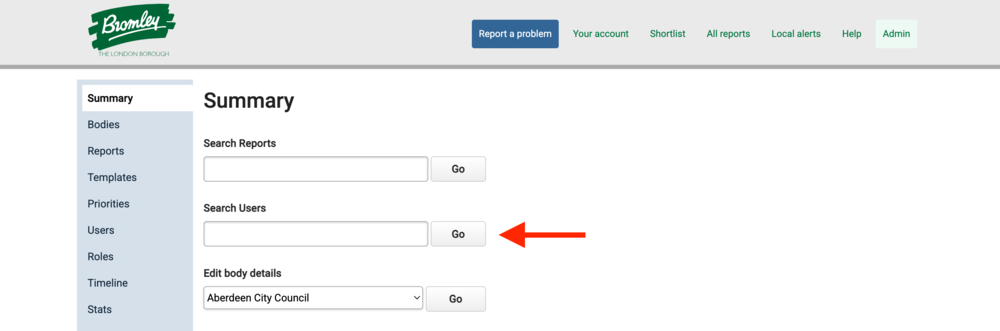
Using the ‘Search users’ box, enter any part of the user’s name. email address or phone number (where given).
The search will return a list of all reports that fulfil your parameters.
Administering user accounts
You may click on ‘Edit’ beside any user to view or change their account details.
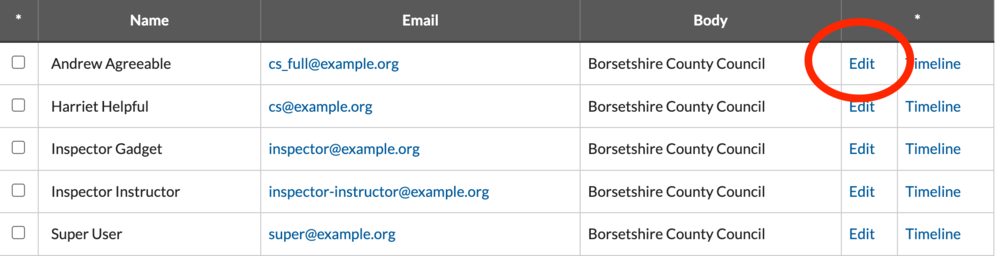
Click the user’s email address to view a list of all reports and updates made by that user, or click ‘Timeline’ to see a timeline of that user’s activities on the site.
Viewing reports as a non-staff user
As a staff user, your view of a report includes moderation functions which ordinary users do not see. If you would like to view a report as a member of the public would see it, there are three options:
- Log out of FixMyStreet, or
- Start a private browsing session, or
- View the page in a different browser to the one you are currently using, in which you are not logged in to FixMyStreet.
Any of these courses of action will allow you to view the site as an anonymous visitor, with no recognition of your staff role.
Creating reports and updates on behalf of another user/the authority
If a member of the public makes a report or update by phone or in person, staff members with the appropriate permissions can add it to FixMyStreet on their behalf. The report will be anonymous on the site, but the resident’s name will still be available in the admin interface. Reports can also be made as if from the council or authority using FixMyStreet Pro.
Staff should make a new report just as a member of the public would — see ‘The citizen’s experience’. Those with the appropriate permissions will see a dropdown box in the report-making interface, labeled ‘Report As’. Select either the council, ‘yourself’, ‘anonymous’ or ‘another user’.
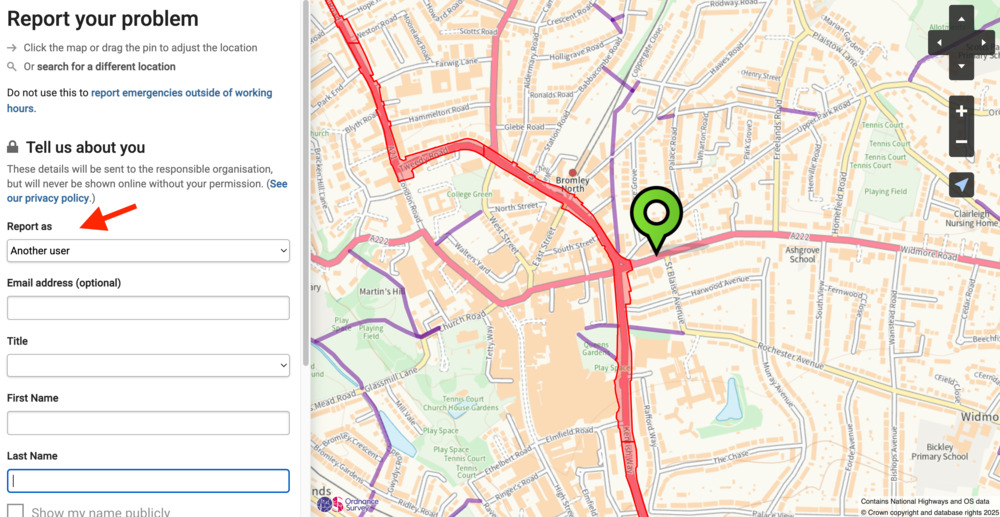
In order to reduce confusion for customer service staff, the email, name and phone number fields in the reporting and update pages are disabled for staff users. This avoids accidental overwriting of their own details with those of e.g. citizens making reports over the telephone in case staff forget to switch the ‘Report As’ control to ‘another user’.
If a user has the ‘Default to creating reports/update as the council’ permission then the dropdown will default to reporting as the council. Staff with the ’Markup problem details’ permission will also default to reporting as the council.
When a staff member makes an update on the site, it will not be publicly displayed with the staff member’s name, but the name of the body to which the user is attached. Staff members with the ‘See user detail for reports created as the council’ permission will be able to see the staff user’s name on the report or update, but other staff and the public will not.
Dealing with undesirable content
Fortunately, abuse of FixMyStreet is fairly rare: undesirable content represents a tiny fraction of the reports made each year. But of course, you need the tools to deal with it, and there are other reasons you may wish to edit a report, too.
Reasons for moderation
- Personal information such as the accidental inclusion of contact details in the report body.
- Potentially libelous content such as complaints about illegal or anti-social behaviour which implicate an identifiable individual.
- Abusive content such as profanity or unsuitable images.
- Corrections - for example, a staff member may have added an update which they now wish to alter because of a spelling mistake (if the report’s status has changed or a factual error was made, we recommend a new update rather than editing an existing one).
We recommend a ‘light touch’ approach to editing, in which any content from a user, other than those types listed above, is left intact. For example, there is no need to correct a report-maker’s spelling or grammar unless they request that you do so.
Moderating reports
When logged in, staff with the required level of permissions can moderate reports directly on the report webpage. You will see a ‘moderate’ button below the report’s main body, and above each update. Clicking this button gives you the ability to:
- Edit the title or body text
- Remove a user’s name
- Remove, redact or restore photographs
You can also add a note to indicate the reason for the change to the report.
Moderation history will be shown within the report updates, and is only visible to people with the moderate permission.
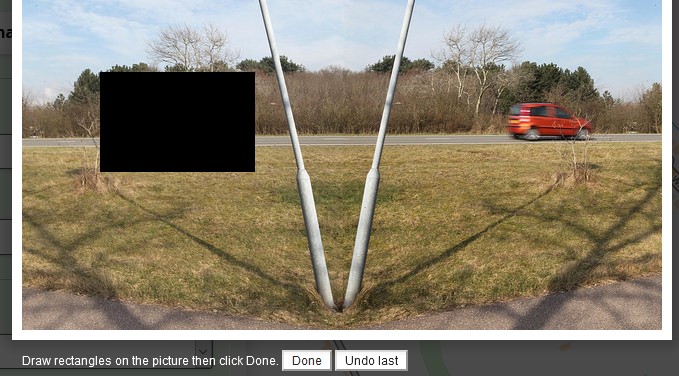
Redacting photographs
When moderating, each photo has an associated “Redact” option. Selecting this opens up the full size photo, on which you can draw black rectangles if you need to hide a section of a photo without removing the entire photo.
Hiding reports
Clicking the moderation button also gives you the option to hide an entire report or its updates. ‘Hiding’ means that the report is no longer visible to the general public, but it remains in the site’s database and is accessible to staff with admin permissions.
Once a report is hidden, staff without admin permissions can no longer access it — so if, for example, they hide a report by accident and wish to revert it to public, they must contact a team member with the appropriate permissions.
Removing users’ names
When users make a report on FixMyStreet, they may choose not to display their name on the public web page. If a user accidentally chooses to display their name and then wishes to remove it, they can do so themselves when logged in to FixMyStreet.
However, if necessary, council staff can also remove a name from a public report on behalf of the user: see ‘moderating reports’.
Adding a user to the abuse list
You can add an abusive user’s email to the abuse list, which automatically hides any reports they create, and means that their reports and updates are not sent. Instead, the user sees a message that there was an error in confirming their report or update.
Staff with the required permissions can ban a user directly from their user admin page, using the ‘Ban user’ button.
Removing users from the banned list
When a user has been banned, an ‘unban’ button will be visible on their user admin page. This restores them to the status of a standard user, but it does not have any effect on reports which were made during the period when the user was banned — these remain unsent.
Creating/viewing private reports
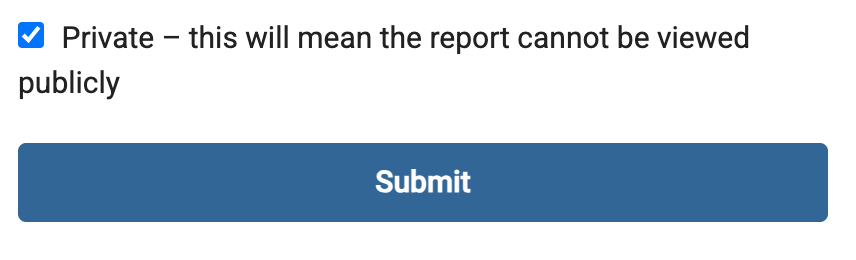
If a you are creating a report that has to contain information that should not be made public, such as names and addresses, then you can create a Private report.
In such cases, staff should make a new report just as a member of the public would — see ‘The citizen’s experience’. Those with the appropriate permissions will see a “Private” checkbox underneath the user details which they should select.
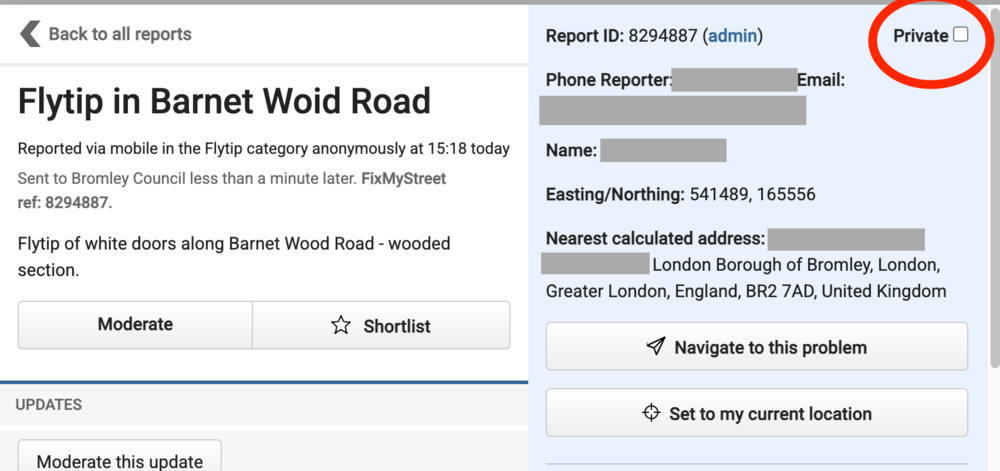
You can also mark an existing report as private by visiting the report page while logged in. Check the “Private” box in the top right of the blue admin panel and remember to click ‘Save changes’.
On the reports page you can select “Private only” from the status filter to display only the reports that have been marked private.
Note: Private reports are still visible to staff members with the relevant permissions and will be sent as normal but will not be visible to members of the public.
Correcting reporter errors
Changing a report’s category
If the user has chosen the wrong category for their report, when logged in, staff with the appropriate permissions can change it from within the on-page editing interface, from the dropdown to the right of the report.
If changing the category of the report results in it becoming the responsibility of another authority, the report will be re-sent to that authority. Do not mark it as closed, even though you have now dealt with it as far as your authority is concerned; from the other authority’s point of view, and for the person who made the report, the status is still open.
Except in a few cases where you may have bespoke workflows in place, if the report remains your authority’s responsibility, the category change does not re-send the report unless the send method has changed (e.g. in the case of councils where some reports are sent via the Open311 protocol and others by email).
Changing the location
- You can click and drag a pin at any time to change the report’s specified location.
- When viewing a report on the ground, staff with the appropriate permissions may click ‘set to my current location’. This will reset the co-ordinates of the issue to reflect a more accurate placement.
Keeping the report-maker informed
Updates can be left on a report in order to keep the creator of the report, and the wider public viewing the site, informed on what is happening.
Note: If you have an integration into a CRM, CM or asset management system, updates to users may be automated and not managed in the below way. This depends on how the integration is set up and how your organisation chooses to manage responses to reports.
Staff members can manually update the state of the report as and when necessary, including states such as ‘in progress’ or ‘no further action’, plus leave a textual update to explain in more detail.
Many issues require identical or very similar responses. Rather than type your reply out each time, staff can choose from a number of pre-written (but editable) template responses, such as ‘Thank you for your report, we’ll be back in touch with an update soon’, ‘Repairs are now underway’ and ‘This issue is now closed’.
Status updates
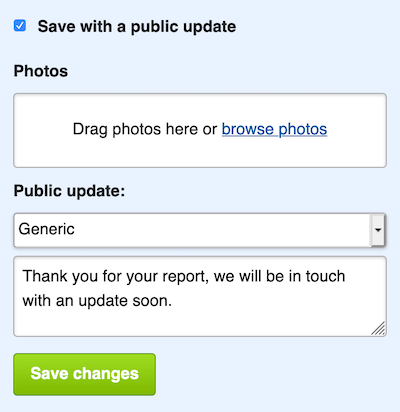
From the report page, staff with the appropriate permissions may select from the ‘public update’ dropdown. This will prefill an update with template text for one of a number of common statuses. The templates are created by the Administrator; see ‘Creating response templates’.
The text in template responses is fully editable on the report page, so staff may also choose to add their own comments or edit the preformatted responses to reflect the precise circumstances of the report. Alternatively they may write an entirely new status update.
In some cases, template responses are automatically attached to a report state — for example, setting the report state as closed may automatically select the template ‘Issue closed’. See ‘Creating response templates’
If ‘Create reports/updates as the council’ is ticked in the staff user’s account permissions, their updates will be labeled as from the council rather than the staff member’s name. For the sake of staff privacy, this is usually preferable.
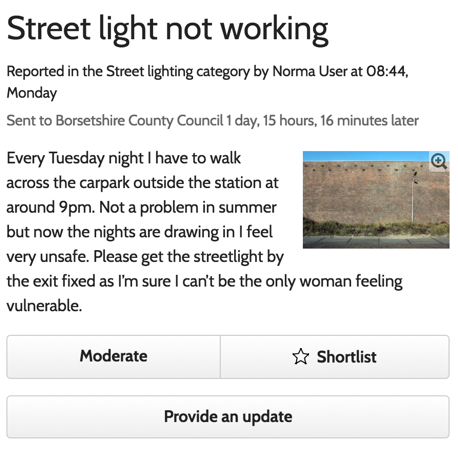
Staff with appropriate permissions can also attach an image to the update, which will then be displayed publicly alongside the text update.
This option is also available via the general ‘Update’ box under the main report.
Please note: depending on how your authority’s cobrand version of FixMyStreet Pro has been configured, the ‘Provide an update’ button as shown in the below screenshot may not appear for you.
Requests for more information
Depending on your preference, you may request more information by contacting the user directly, or by leaving a status update on the report that asks for the details you need. Both will reach the report-maker; the difference is that a status update can also be seen by anyone viewing the report online.
Prioritising tasks
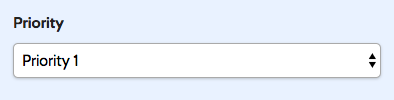
Setting a priority
From the panel on the right hand side of a report, staff with the appropriate permissions may select a priority from a drop-down list. These priorities are created by Administrator-level users; see ‘Setting categories and priorities ’.
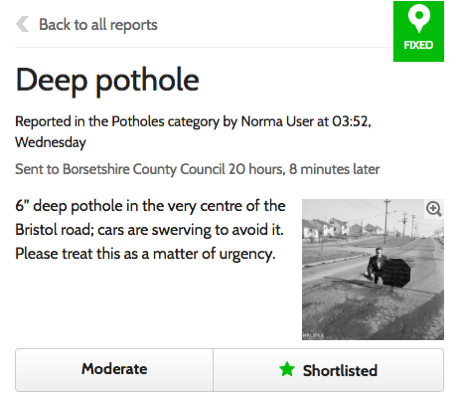
Working with shortlists
You can easily create a shortlist of reports that you need to inspect, and arrange them into the order that suits you best. Once that’s done, you can consult them via a mobile device — even when offline — or, if you prefer, print the list out on paper.
Making a shortlist
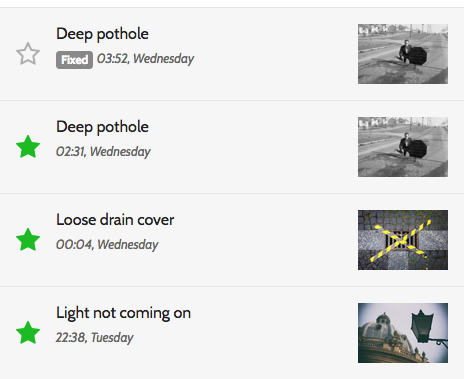
First, navigate to the ‘All reports’ page where you will see issues listed on the left. In most cases, it’s useful to leave these in their default of ‘sort by newest’ so that you see the most recent reports first, and to use the dropdown to filter the reports so that you only see those which have an ‘open’ status. You may also wish to limit your results to a specific category. See more about filtering and sorting reports.
Once this is done, you can add a report to your shortlist by clicking on the star beside it. The star will turn green to indicate that it has been added. Click the stars by any report which you wish to investigate.
At a certain level of zoom, there’s also the ability to ‘add all reports visible to shortlist’, which allows you to make a bulk addition of everything within the area.
Alternatively, you may add a report from within the individual report page. Adding a report to your own list will remove it from any other staff member’s list to which it has previously been added.
Viewing, editing and sorting the shortlist
Click on ‘Shortlist’ in the top menu bar and you will see all the reports which you’ve selected. You can continue to add more reports by returning to the ‘all reports’ page.
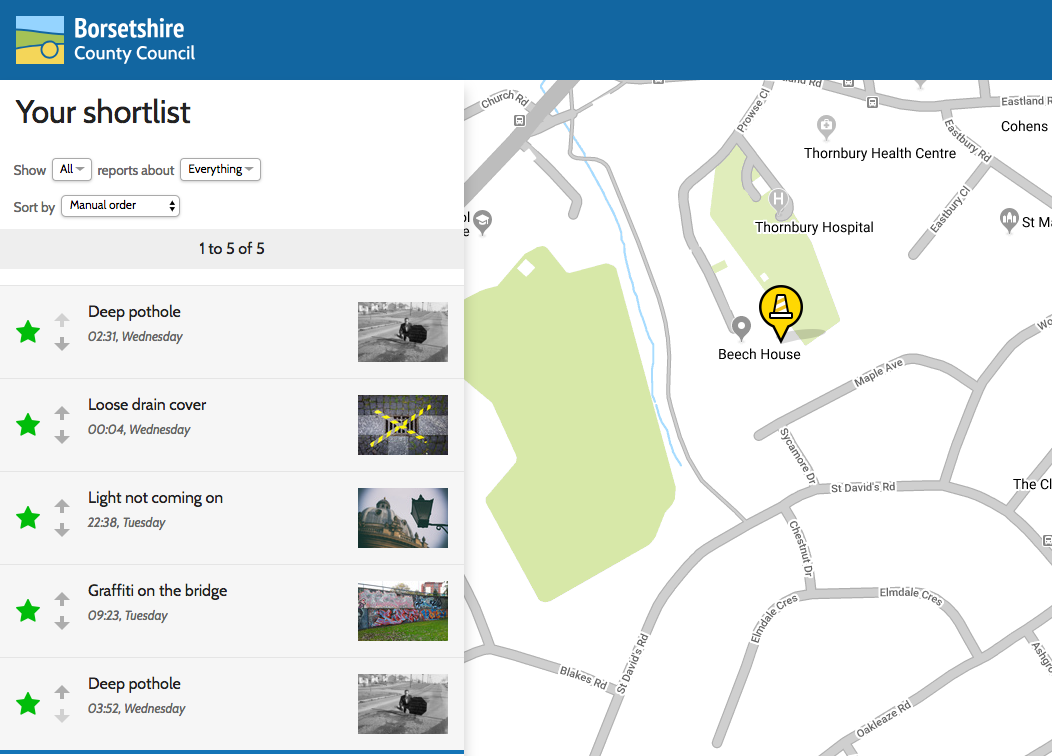
If you wish to remove a report from your list, click on the green star again. This can be done on the individual report’s page, from the ‘all reports’ page, or from within your shortlist.
Shortlists can be ordered and filtered in the same way as the main list, by using the dropdown menus. You can also use the arrows beside each report title to move them up or down the list, until they are in a practical order for your route or priorities.
Assigning reports to another user’s shortlist
Managers of teams of inspectors can assign reports to the shortlists of inspectors (i.e. staff with the ‘Markup problem details’ permission). The assignment dropdown appears when editing reports with the inspector tool, but only if there are any users available to be assigned.
Reports can also be assigned in bulk from the ‘All reports’ page, where inspector managers can see at a glance which reports are assigned to which inspectors.
Assigned users can also be viewed on the Reports list page in the Admin area, as well as when editing a report in that list by clicking its ‘Edit’ link.
Seeing which reports are assigned and unassigned
In addition to seeing their own shortlist, inspectors can, like inspector managers, see which reports are assigned to other inspectors, both in the individual report webpage and in the ‘All reports’ list.
Viewing navigation routes
From any report, you can click the button marked ‘navigate to this problem’. This will open a separate tab in your browser, and plot a route on Google maps from your current location.
Viewing and editing reports offline
In the same way that members of the public can use FixMyStreet while offline to start reports, staff users can also access reports without internet connection - useful for on-the-ground inspectors operating in areas of poor connectivity.
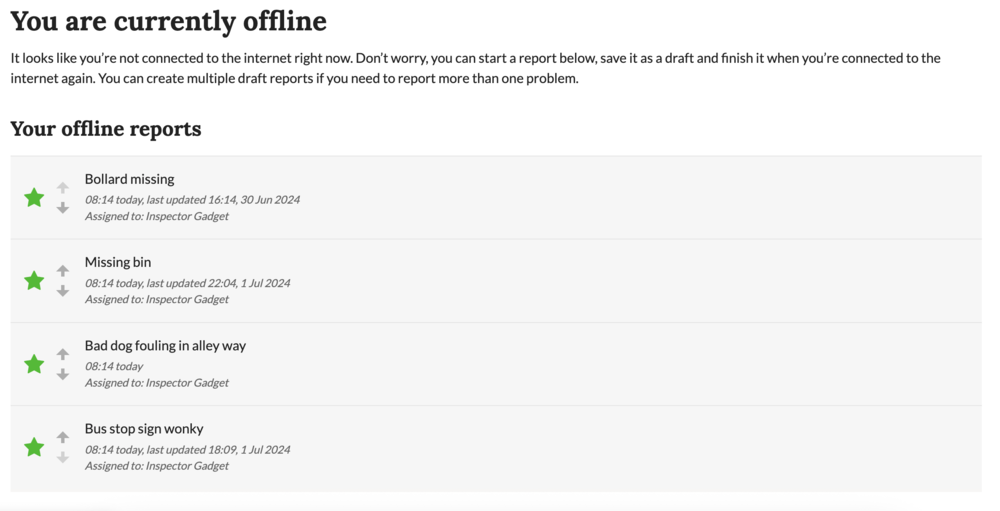
Visit your shortlist page before you go out and about: you’ll see a message that the list is being cached for use offline. That means that whenever you are viewing the page without an internet connection, you’ll be able to see the reports — make sure you have the shortlist page bookmarked so that you can find it when you need it.
While offline, you can:
- view or edit reports
- create new reports
- create or edit updates to reports.
Note: To synchronise your records once you’re back online, just visit any page on FixMyStreet and click the prompt to submit your changes.
Administrating staff accounts
Creating a staff account
Click on ‘Admin’ in the top menu bar and go to the ‘Users’ tab in the admin menu (left side of the page).
You’ll see a table of existing users. Below this is the ‘add user’ interface.
First create the basic user account by inputting a name and email address, plus any other contact details desired. Once this is done and you have saved the input, you can edit the account to assign any roles or permissions required.
The ‘Staff’ checkbox cannot be unchecked; this guarantees a new user will be a staff user, and will be automatically assigned to the correct body.
The new staff user can then log in via the normal method.
Creating roles
Go to the ‘Roles’ tab in the admin menu.
Here you can create a group of permissions, called a ‘role’. You should choose role titles and definitions that make sense to your own organisation.
Roles enable you to more easily assign permissions to different staff users. For example, you can give all customer services staff the same permsissions by assigning them the same role, without having to assign permissions individually for each user.
Once you’ve created a role, use the tick boxes to assign its permissions.
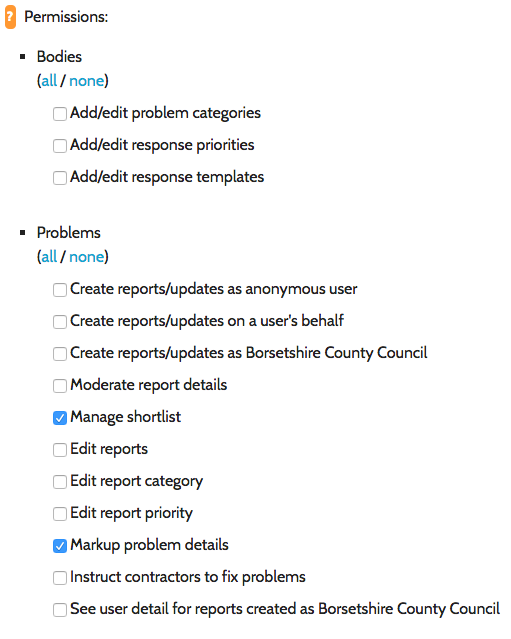
FixMyStreet Pro permissions include:
| Permission | Description |
|---|---|
| Add/edit problem categories | Allow the user to add or edit categories within which reports can be made through your FixMyStreet Pro service (go to the Creating and editing categories section) |
| Add/edit site message | Allow the user to add or edit messages to be displayed on the homepage or other pages of the website (go to the Displaying a site message section) |
| Add/edit response priorities | Allow the user to assign and edit response priorities (go to the Creating and editing priorities section) |
| Add/edit response templates | Allow the user to add and edit the response templates attached to your report categories and states (go to the Creating and editing response templates section) |
| Assign problem reports to users | Allow the user to assign reports to other users (go to the Working with shortlists section) |
| Assign users to areas in [Council/Authority] | Allow the user to assign certain report categories to specific users or to user roles so that those users only see reports within the assigned categories (go to the Administering staff account section) |
| Automatically populate report subject/detail | By default, reports created by this staff user will have the report subject and details automatically populated to save time according to the selected category |
| Create reports/updates as anonymous user | Allow the user to create reports anonymously (go to the Creating reports section) |
| Create reports/updates on a user’s behalf | Allow the user to create and update reports on behalf of other users, e.g. contact centre staff making reports on behalf of someone who cannot access digital services (go to the Creating reports section) |
| Create reports/updates as [Council/Authority] | Allow the user to create reports or submit updates as the council/authority ((go to the Creating reports section) |
| Default to creating reports/updates as [Council/Authority] | By default, all reports and updates created by this user will be made as the council/authority (go to the Creating reports section) |
| Edit reports | Allow the user to edit any information within any report from the administration dashboard (go to the Correcting user error section) |
| Edit report category | Allow the user to edit a report’s category (go to the Correcting user error section) |
| Edit report priority | Allow the user to edit a report’s priority (go to the Creating and editing priorities section) |
| Edit users’ details/search for their reports | Allow the user to edit other users’ details and search for their reports (go to the User search section) |
| Edit other users’ permissions | Allow the user to edit the permissions of other users (go to the Administering staff account section) |
| Grant access to the admin | Allow the user to give other staff admin access (go to the Administering staff account section) |
| Instruct contractors to fix problems | Note: This permission only applies where an authority chooses to set up ‘Super users’. Allows the user to provide extra information to a report and direct it straight to a contractor. |
| Manage shortlist | Allow the user to make, view and edit a report shortlist (go to the Working with shortlists section) |
| Markup problem details | Allow the user to view and edit the details of a report, including marking reports as private, setting the priority of a report and providing updates, from the front-end inspector form which appears when a report is selected by a staff user with this permission (go to the Correcting user error section) |
| Moderate report details | Allow the user to moderate details within a report, such as removing accidental user-generated PII or redacting images (go to the Dealing with undesirable content section) |
| See user detail for reports created as [Council/Authority] | Allow the user to see the user details for reports made by members of staff on behalf of the council/authority (go to the Creating reports section) |
| View/Mark private reports | Allow the user to view private reports and mark reports as private (go to the Creating and viewing private reports section) |
| View Dashboard | Allow the user to view the dashboard (go to the Viewing statistics section) |
By not assigning a permission to a role or to an indivudal user, they will not be able to complete the associated admin task. Users cannot edit their own permissions.
Once you have created some roles, you can then assign a user to one or more roles to give that user access to all the permissions of those roles.
Assigning roles and permissions
Once you have created the basic staff user account, you’ll be taken to a page where you can assign roles and permissions.
You can also always edit any user from the table at the top of the ‘Users’ page by clicking ‘edit’. Select the roles or permissions you wish that user to have, and click ‘submit changes’.
Setting categories to users and roles
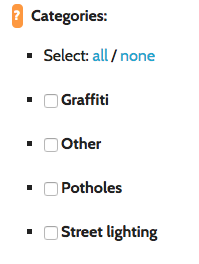
The Administrator can allocate one or more categories of report (e.g. Potholes or Highways maintenance) to a staff user by editing the user and checking the relevant category boxes. The staff user, when logged in, will then only see reports within those categories. This is useful where a staff user only deals with reports of a specific type.
Roles can also have categories associated with them. This works in the same way as assigning categories to a user. You can assign categories to a role by editing the role and checking the relevant category boxes. By default, users will then be shown a filtered list of categories relevant to their role.
Please note: there is no restriction functionality to prevent users from seeing other categories by removing the default filter. However, this can be done if required by:
- Ticking “Frontend staff access only to users assigned to this category” on a particular category page - this restricts the category, so that only staff assigned to that category will see staff-related features.
- Ticking “Assigned categories only” on a user’s page - this restricts that user to only see front end staff features in their assigned categories.
Removing staff status from accounts
To remove the staff status from an account visit the ‘Users’ page, select the user in question and uncheck the ‘staff’ checkbox.
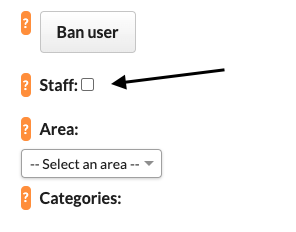
To prevent a user from logging in uncheck the ‘email verified’ checkbox.
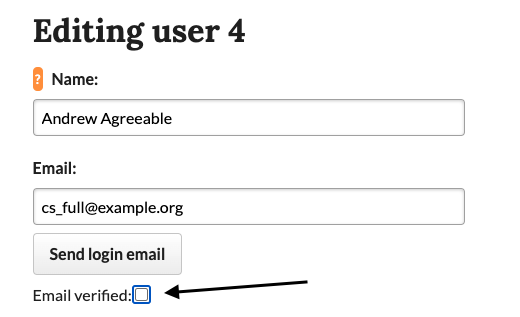
You can do this in bulk on the ‘Users’ screen by selecting the checkbox next to the user’s name on the ‘Users’ page, selecting the ‘Remove staff permission’ checkbox and clicking submit.
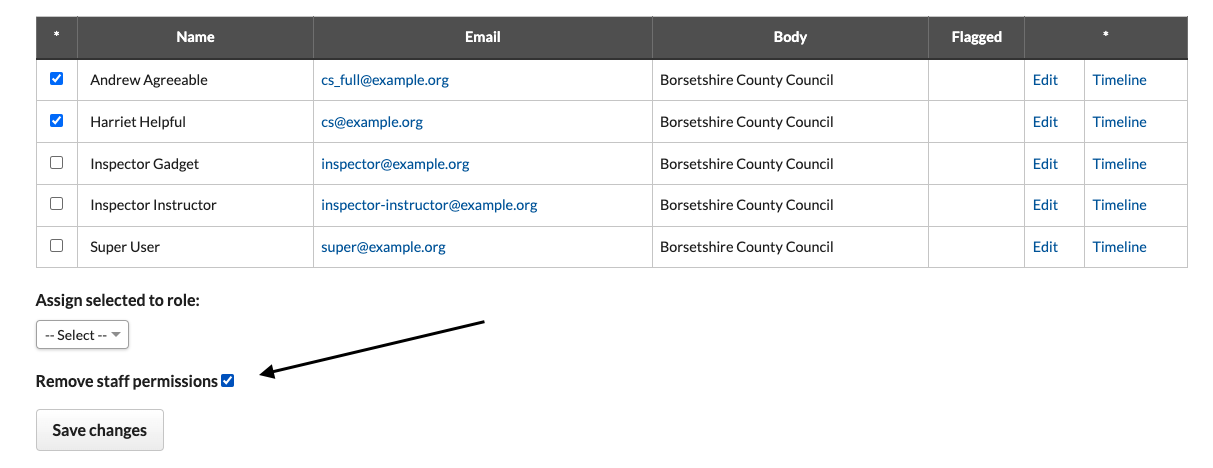
Please note: If a user has access to the email address associated with an account they can re-enable their account, but will not have staff permissions.
Removing accounts
To remove an account, the Administrator-level member of staff can anonymise it or make contact with SocietyWorks to have the account fully deleted.
Two-factor authentication
Any staff user can choose to set up two-factor authentication on their account.
To do this, they will need an app on their phone that can generate time-based authentication keys, such as Google Authenticator or a password manager. Then they can visit their account page on the site and select ‘Activate two-factor authentication’ to receive a QR code to scan with the app.
If you wish your organisation to have mandated two-factor authentication, please get in touch.
Creating and editing categories
Note
If your FixMyStreet Pro installation has been integrated with a CRM system, this section might not fully apply; it is possible categories are managed from within the CRM, and FixMyStreet will be set up to work with these. Some installations only integrate on some categories, and some sections such as form disabling can still be used on top of an integration.
Staff users with the appropriate permissions can dictate which categories the site displays when a report is being made.
These categories also become one of the criteria by which all users — both members of the public and staff users — can filter reports when viewing them on the site.

Creating a category
From the ‘Admin’ menu, click on ‘Categories’.
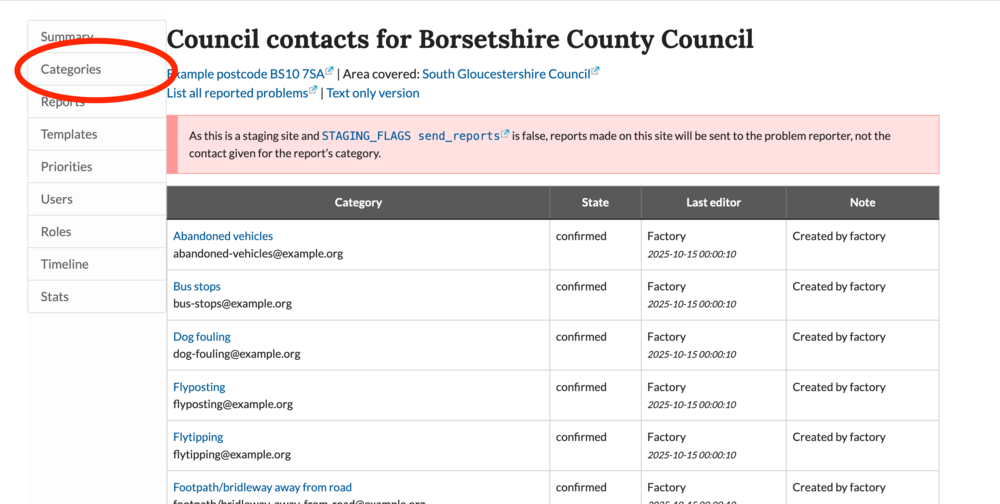
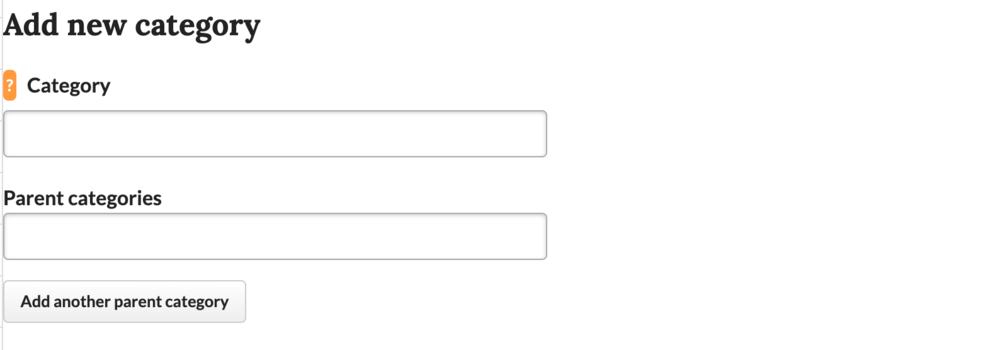
You’ll see a table of existing categories, and below that, a form by which you can create new ones (if you have lots of categories you’ll need to scroll down the page to find the ‘Add new category’ form).
Input a title for the category, and the email address to which reports in that category should be forwarded.
You can also choose to assign a category to one or more parent category/ies. For example, you may group a ‘Fallen tree’ category under a parent category of ‘Parks maintenance’ and also under ‘Public right of way’, but note that the report will go to the email address provided, so if certain instances of problems need to go certain addresses, then create a separate category.
Applying optional category settings
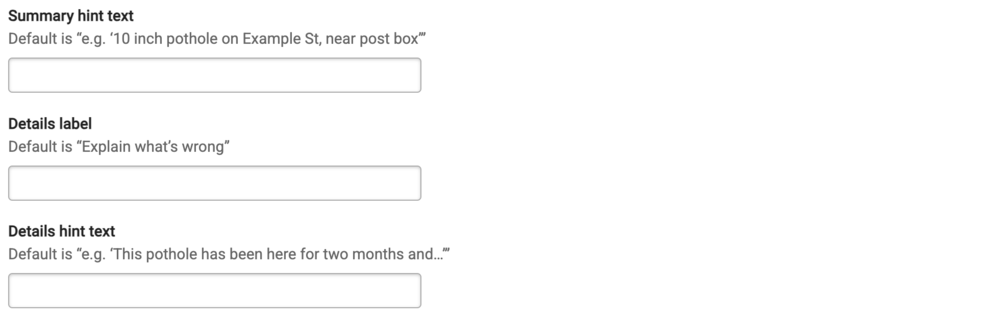
Once you have set the category title and provided an email address to which reports in that category should be sent, you can then apply a variety of other optional settings and specifications to your category.
For example, you can edit the default text included in the hints and labels for reports in this category.
You’ll also see an option to set a timeframe within which reports in this category should be closed to updates.

The purpose of this is to prevent users providing updates on old reports to alert to a new occurrence of the same issue, which could impede resolutions and may impact your report data when analysed. For example, if a problem is something you know is likely to reoccur in the same area, such as fly-tipping in a known hotspot, you may want to set a shorter timeframe within which updates can be applied to an existing report. That way, when a new instance of the issue occurs, you can help to ensure a new report is made instead of a user updating an existing report because they haven’t realised it’s not the same problem.
If no individual timeframe is applied to a subcategory, reports will be closed to updates within the default timeframe of six months, unless you have requested an alternative default timeframe to be applied to your instance of FixMyStreet Pro.
Some FixMyStreet Pro instances may request to have the option to set a different display name so that the public sees a different category title to the one you’d like to use behind the scenes (useful if you want to have reports of the same type of issue in different places/parent categories go to different email addresses/integrated system areas eg. the parent categories “Grass/verge issue” and “Hedge/vegetation issue” could each have their own “Blocking visibility on road/junction” subcategory, but they both display to the user as “Blocking visibility on road/junction”.) If you can’t see this option and you would like to use it, please contact us.
Using the checkboxes, you may also choose to apply settings such as to automatically hide any reports made in this category, show a notice to prevent form submission when this category is selected, or restrict updates on reports in this category. See below for information on creating/editing extra notices and questions for a category.
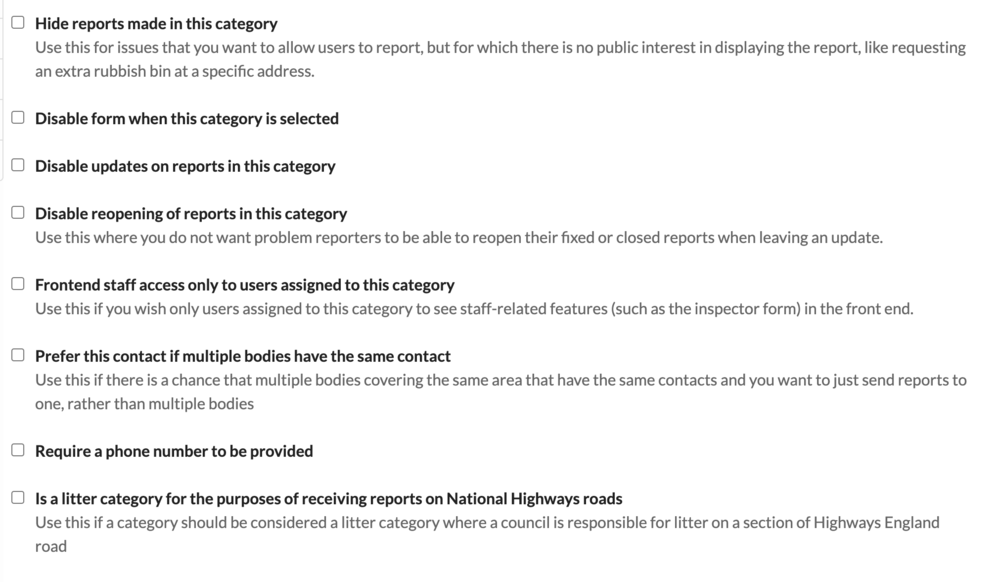
You may also be able to configure categories to allow anonymous reporting if you have this option available. If this is not available but you would like it to be, then contact us to discuss it.
Categories can be made ‘staff only’, where they are only available to logged-in members of staff, not members of the public. This could be used for e.g. contact centre staff to leave reports in categories that you still want to be phoned in.
Categories can be marked as a litter category for when the council is responsible for litter on parts of a Highways England road. This will mean the category will be included in the Highways England categories for any relevant stretch of road.
Best practice
You can set up as many or as few categories as you like, and each category can have its own email address attached to it, so for example, reports about potholes may go to one council email address, while reports about road signs go to another. More than one category may share the same email address, if required.
For the best user experience, categories should be limited to no more than 20, and should be fairly broad — so for example, one category titled ‘Parking’ is better than several titled ‘Bad parking’, ‘Car parks’, ‘Parking meters’, etc — especially if all the reports end up in the same mailbox. Fewer and broader categories ensure better accuracy in the routing of reports that you receive, as it is easier for a user to identify the correct one.
Category titles should, as far as possible, use language that residents of all levels of experience or education are likely to understand, rather than internal council or highways management jargon (such as ‘paths’ rather than ‘footways’ and ‘roads’ rather than ‘carriageways’ or even ‘highways’). We always recommend the inclusion of one category titled ‘Other’, for reports which do not fit into any pre-existing category. This should route emails to a general mailbox from where a member of staff can forward them to the most suitable destination.
Editing categories
You can edit categories at any time by clicking on the category title within the table at the top of the ‘Categories’ page.
From here, you can change the email address that the reports in this category are routed to, or any of the other options for the category, such as the hint text shown to the user for this category, whether reporting should be disabled when this category is selected, or whether updates should be disabled on reports in this category.
Important: Do not edit a category name if it is linked to an asset layer.
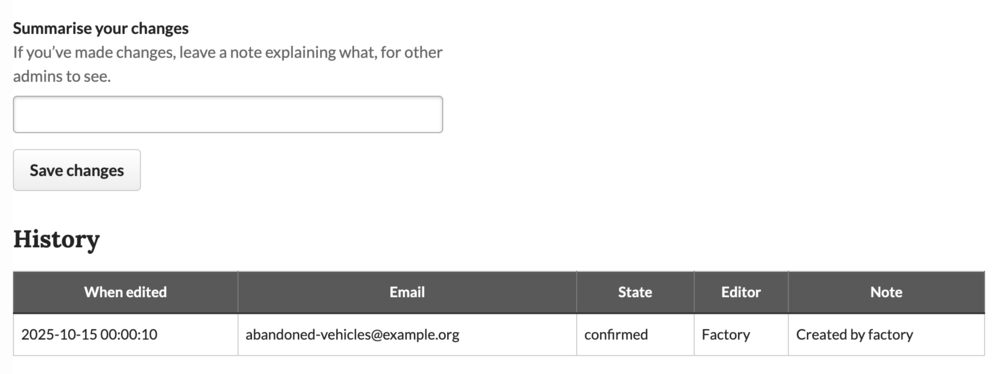
Whenever you make a change to a category, it’s a good idea to summarise these changes to help other members of staff at your organisation understand what and why. A decision log is stored at the bottom of the page under the ‘History’ heading.
Creating and editing category notices and questions
Note
If your FixMyStreet Pro installation has been integrated with a CRM system, some of this section may not apply, eg. extra questions may be pulled directly from the backend.
Each category can have additional notices and questions associated with it, called “Extra data”. You can add as many as necessary (though we do recommend as few as possible, to stop people being put off from filling in your form), reorder them, and update them. No extra data answers are shown in public by default.
To get started, click the ‘Add field’ button under the ‘Extra data’ heading.

You’ll then be shown a variety of inputs to choose from.
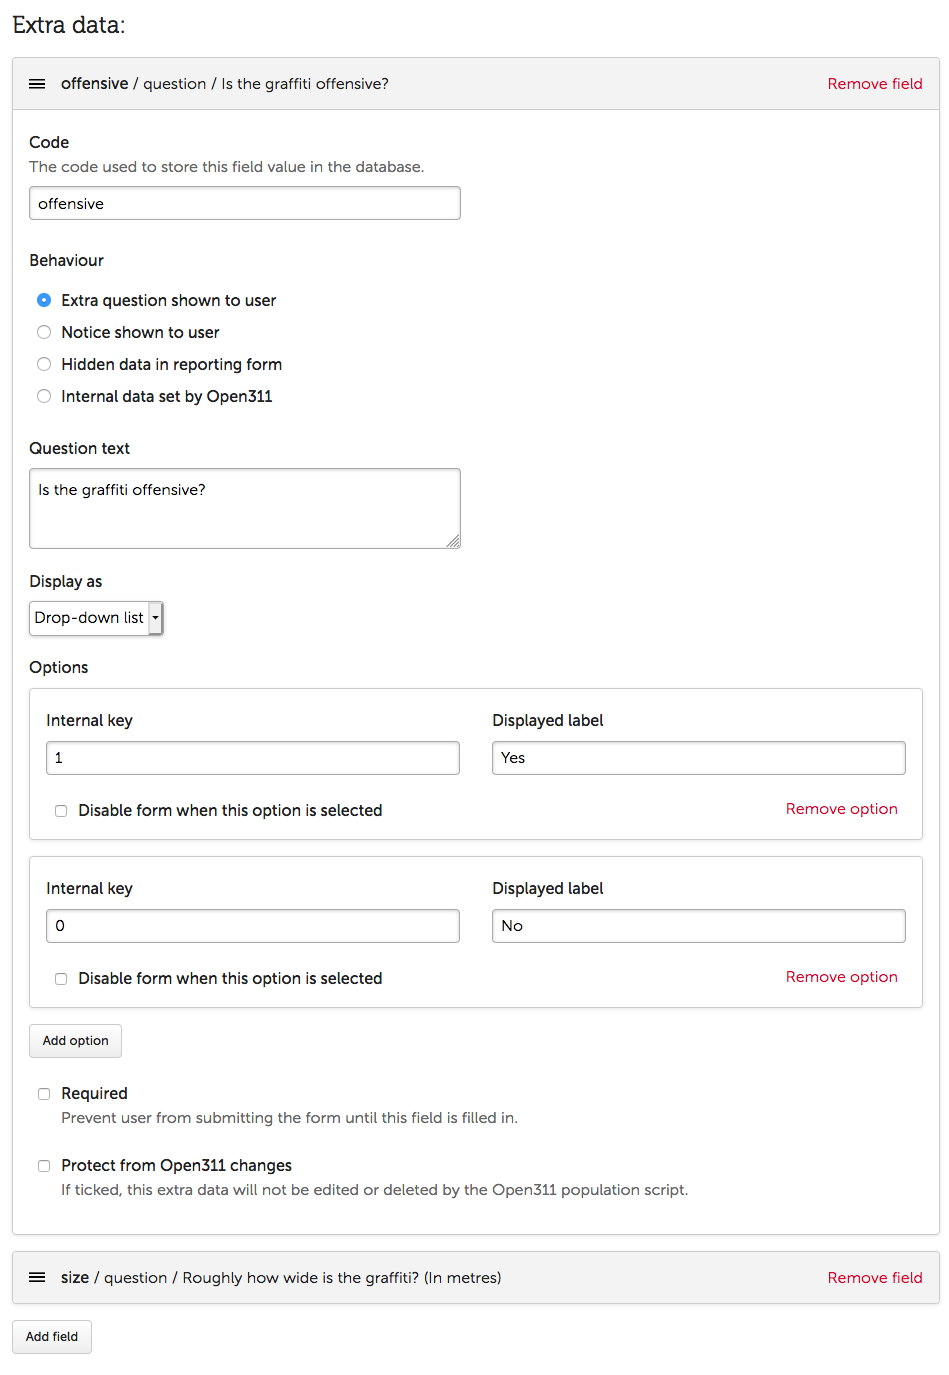
Extra questions
Extra questions enable you to ask the user to provide some specific additional information that you require in order to treat the problem appropriately. Answers can either be provided via a free-text field, or a drop-down, where you can specify the options to be picked from.
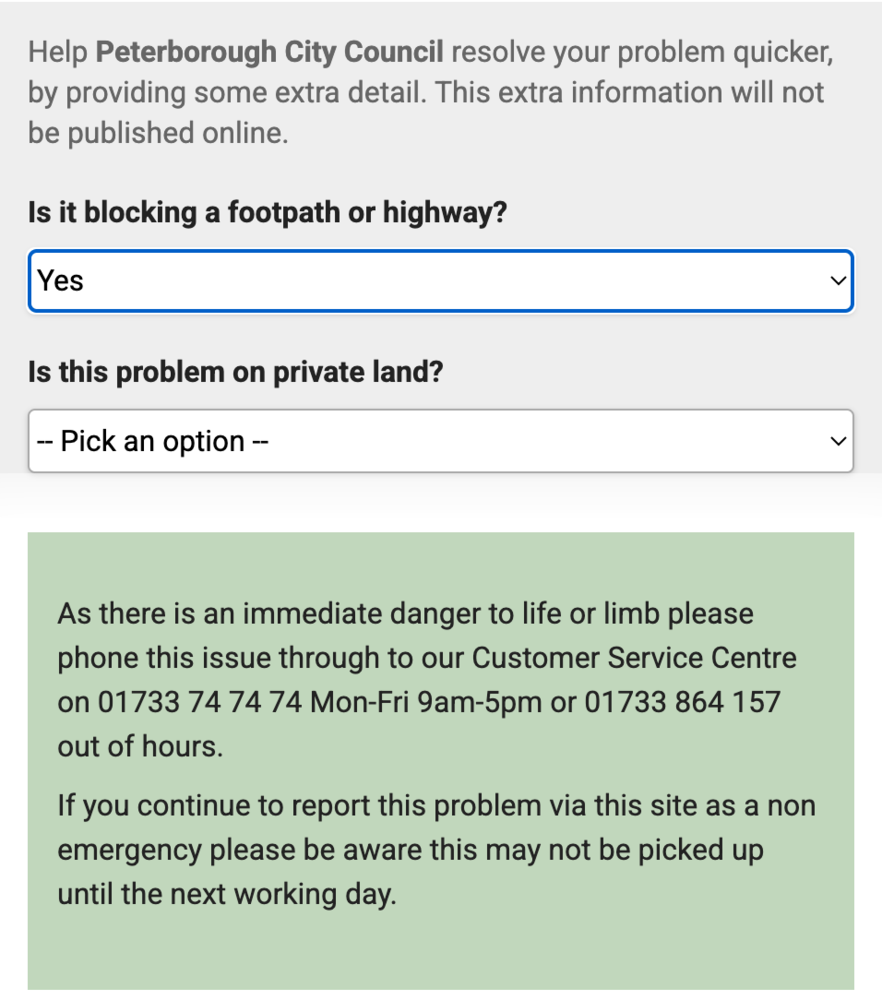
You can selectively disable the form submission process based upon a drop-down question answer - for example, if you had a question asking if the situation was dangerous, you could disable the form if the reporter answered Yes and display a message asking the user to call an emergency number instead.
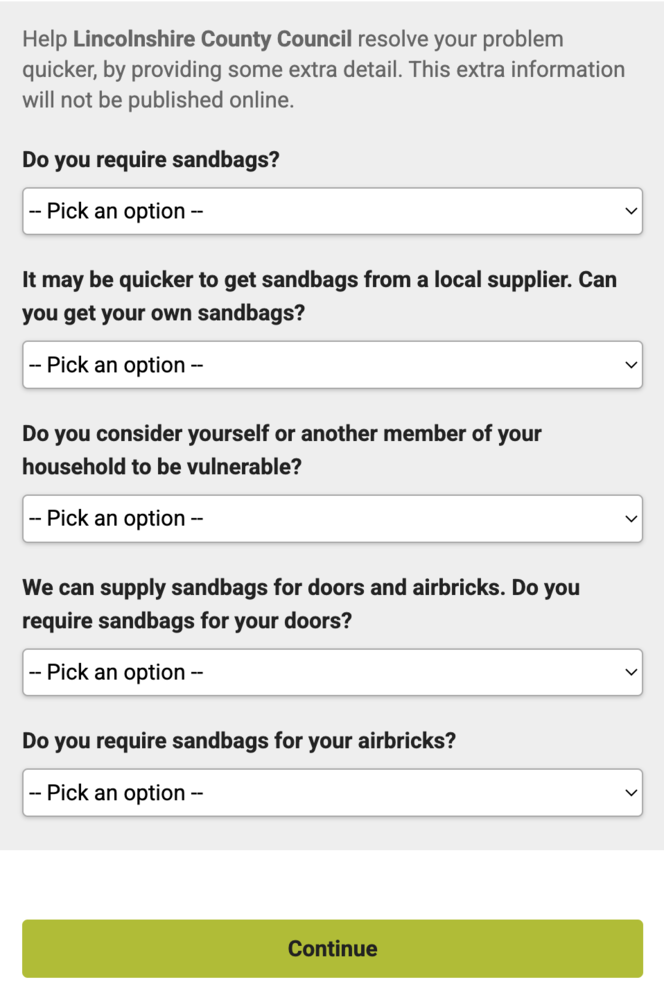
Extra questions can also be used to enable the user to self-serve othern relevant information associated with their report - for example, to ask whether the report-maker requires sandbags when they are reporting a flood risk.
Notices
A notice is some text that is displayed to the user when the category is selected. This can be used to provide extra information about the category (eg. seasonal maintenance schedules), point specific cases elsewhere (eg. a phone number for urgent enquiries), or anything else you think the reporter may find useful.
HTML content in notices
Sometimes it can be helpful to use different text formatting or include images in the notices shown to users. You could, for example, include photos that illustrate the sorts of issues users should report in a particular category.
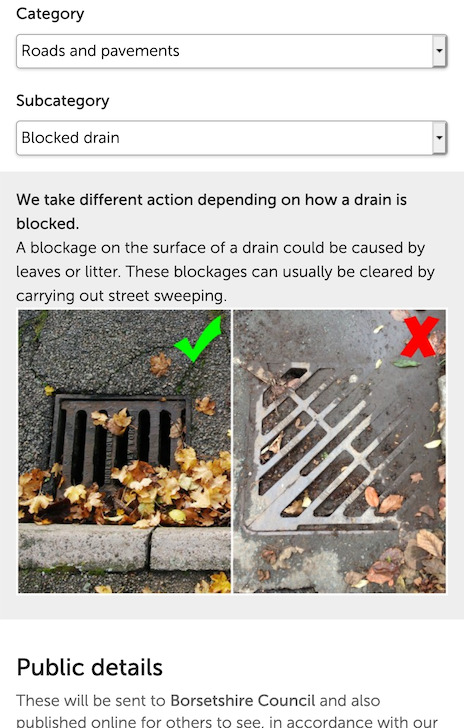
The Notice text field allows you to include HTML tags to apply text formatting, add links, or include images in the notice shown to the user. The above notice was generated from this HTML:
We take different action depending on how a drain is blocked.<br>

<span style="font-weight: normal">A blockage on the surface of a drain could be caused by leaves or litter. These blockages can usually be cleared by carrying out street sweeping.</span><br>

<img loading="lazy" src="https://www.borsetshire.gov.uk/images/BlockedDrainExamples.jpeg" alt="Compared with a surface blockage, an internal blockage could be caused by leaves, mud, or stones and need specialist equipment.">
The following HTML tags are allowed for use:
pulollibrbistrongema- The following attributes are allowed:
href,style,target="_blank",title
- The following attributes are allowed:
img- The following attributes are allowed:
src,alt,width,height,hspace,vspace,align,sizes,srcset - NB The
altattribute is required if you’re giving information only present in the image.
- The following attributes are allowed:
span- The following attributes are allowed:
style
- The following attributes are allowed:
Any other tags or attributes not allowed by the above list will be stripped out when you save your changes on the form.
Hidden/internal data fields
As well as questions and notices, you can set up hidden and internal data fields. A hidden data field will be output in the reporting form HTML (so eg. clicking on a map asset could fill this field with the asset’s ID), whereas an internal data field is not output in the HTML (this is for special fields that your server knows to accept, e.g. different co-ordinate systems, special handling of textual input, and so on).
Setting a duplicate report radius
FixMyStreet Pro can suggest potential duplicate reports to users when it looks as though a report is being made in the same category and location as an existing report. If the problem that’s about to be reported is indeed a duplicate, FixMyStreet Pro encourages the user to subscribe to the existing report instead of creating a new one, saving time for the would-be report-maker and creating no extra work for the authority.
By default FixMyStreet scans for open reports, but you can customise this to also include internal, closed, fixed or even related sub-category reports.
The radius within which reports are suggested to users can be also customised on a per-category basis. For example, a larger radius can be useful for reports about issues that are likely to cover a large area, where users may drop a pin in a number of places to report the same issue. Meanwhile, a smaller radius can be more helpful for categories of problems in areas where there may be lots of reports of similar, but not identical problems.
If you could like to apply or change the duplicate report suggestion radius for a category, please open a ticket on Freshdesk as this needs to be done by one of our developers.
Creating and editing priorities
Priorities indicate the relative urgency or importance of a report. You can set them to reflect your own internal prioritisation system; there’s also space to add priority codes to comply with external services that reports may be passed on to.
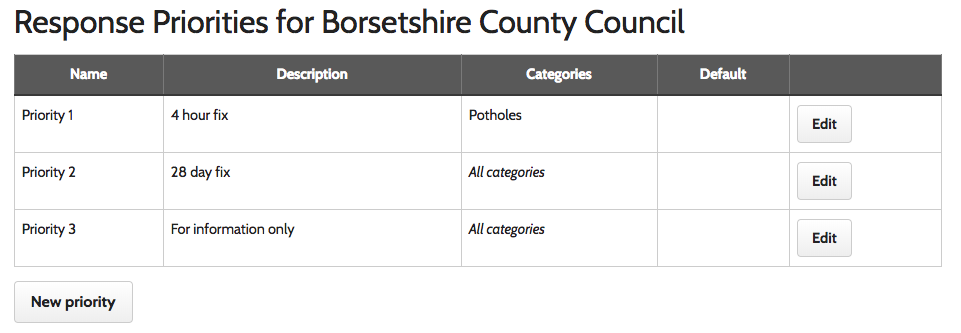
Create a new priority
Click on ‘Priorities’ in the admin menu. You will see any existing priorities listed in a table. Click ‘New priority’ to add a new one, then provide the following details:
- Name Give the priority a name which will be recognisable when it is being chosen from a dropdown list within a report, e.g. ‘High priority’.
- Categories Priorities can be applied to one or more category of report: check the boxes to indicate which categories.
- Description Include a description of the priority, e.g. ‘Four hour fix’.
- External ID Any code that needs to be passed on to external contractors or services. - Default priority Tick the box if this priority applies to all reports by default.
Edit an existing priority
Click on ‘Priorities’ in the admin menu. You will see any existing priorities listed in a table. Click ‘edit’ to make changes to an existing priority, and change any of the following, as required:
- Name The identifier which appears, to staff with the appropriate permissions, in the dropdown menu within a report.
- Categories Priorities can apply to one or more category of report: check the boxes to indicate which categories.
- Description Include a description of the priority, e.g. ‘four hour fix’.
- External ID Any code that needs to be passed on to external contractors or services - Default priority Tick the box if this priority applies to all reports by default. If you check this box, it will override any existing default priorities.
- Flag as deleted Removes the priority from the system so that it can no longer be applied to reports.
Creating and editing response templates
Staff users with the appropriate permissions may create and edit pre-written responses, so that they can be applied to reports quickly and easily.
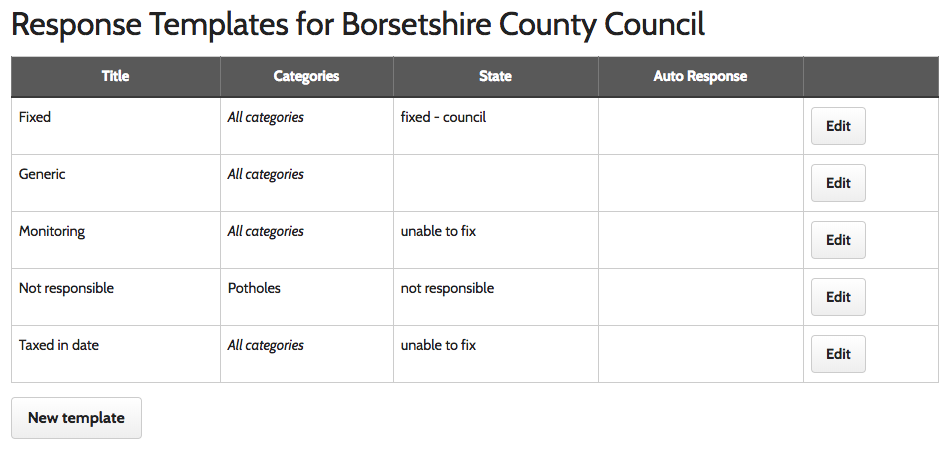
Creating a template
Click on ‘Templates’ in the admin menu. You will see a table of any existing templates. Click on the button below, marked ‘New template’.
Common template responses deal with statuses such as: Report received; Scheduled for inspection; Not council responsibility; Scheduled for repair; Work underway; Unable to fix; Re-opened; and Resolved.
There is no limit to the number of template responses you can create. When creating templates, you should consider:
- What are the most common response types that you send back to report makers? It may be worth examining recent responses to find out.
- How should you word your response template text to make it as easy as possible for the report maker to understand the status of their issue?
- What title should you give the template so that it can be easily identified from a drop-down list when it is being applied by staff users?
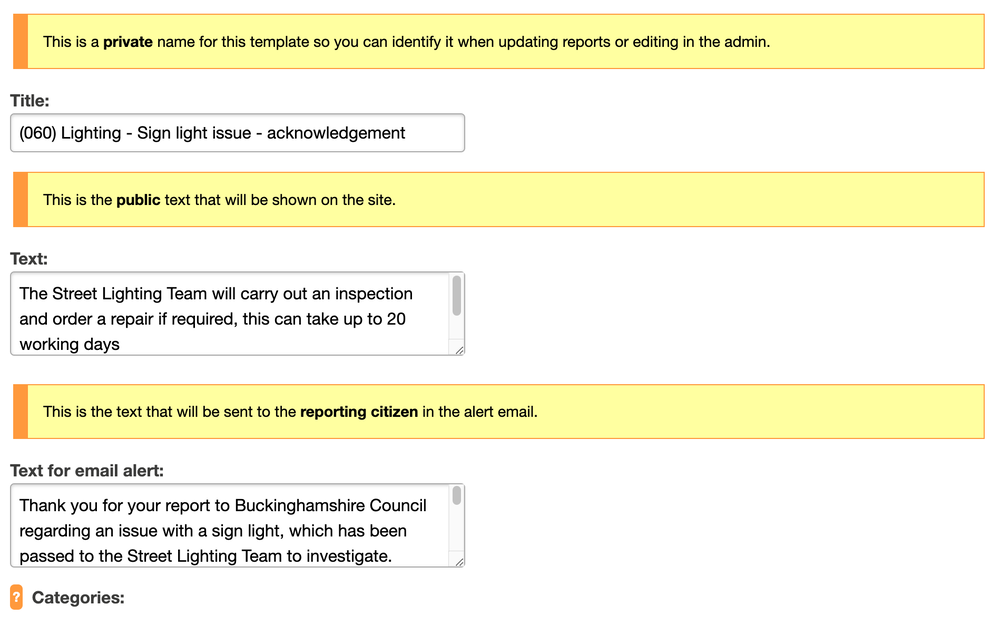
Input a title and some text for your template, then set which categories it should apply to. You may create different templates for each category, or use the same templates across multiple categories.
If you optionally enter text in the ‘Text for email alert field’, the template text will update the report on the website and the email text will be sent to the user if they have opted in to alerts. Otherwise the email text will be the same as the template text that has updated the report.
Attaching states and external status codes
Depending on whether or not your FixMyStreet Pro is integrated with one of your existing systems (such as a CRM or asset management system) you can either select to attatch a ‘State’ to this response template (eg. ‘Open’, ‘In progress’, ‘Fixed’), so that the template response is automatically used when that state is applied to a report, OR you can attach an External status code, which will tell FixMyStreet Pro to use this response template when a report’s status changes within your integrated system (eg. Confirm).

We strongly advise making sure that the template text is applicable to every situation in which is will be automatically applied.
If you have an Open311 connection, you can click ‘auto-response’ so that a
template will be applied when the state is updated by the automated Open311
process. In this instance, if your Open311 server returns extra text as part of
the update, you may put the placeholder {{description}} in the template text above,
and that placeholder will be replaced by the text from the Open311 server.
If you don’t have an Open311 connection, or your Open311 connection does not provide an immediate initial update, there is a special case where if a template is assigned to the Open state, and marked as ‘auto-response’, then it will automatically be added as a first update to any new report created that matches the template (ie. in the relevant category if assigned). This lets you give eg. estimated timescales or other useful information up front.
Editing or deleting a template
Click on ‘Templates’ in the admin menu. You will see a table of existing templates. Click on ‘Edit’ beside the status you wish to change. You may alter any of the fields as described in the section above, ‘Creating a template’. Additionally you can delete the template from this page.
HTML content in templates
HTML tags are permitted in response templates, which makes it possible to include hyperlinks or rich text formatting in the updates which are added to reports.
Be aware that response templates are emailed to users as well as being shown on the site, so it’s best to keep any HTML formatting quite light-touch due to the quirks of email clients’ rendering of HTML message.
Refer to the section “HTML Content in notices” above for details of what tags and attributes are allowed.
Sending responses via text (via Notify)
Depending on the plan you have chosen, you may be able to set up an integration with GOV.UK Notify to allow users to opt to receive updates from FixMyStreet Pro via SMS.
This requires a fair amount of work at your end first, including setting up a new service in your GOV.UK Notify account, and giving us access to it so that we can set it up to be able to send text messages as either a test or a trial so it can be tested on staging.
If you are interested in setting this up, you should first talk to whoever is responsible for your Notify service if used elsewhere in the authority, then open a ticket on Freshdesk to discuss next steps.
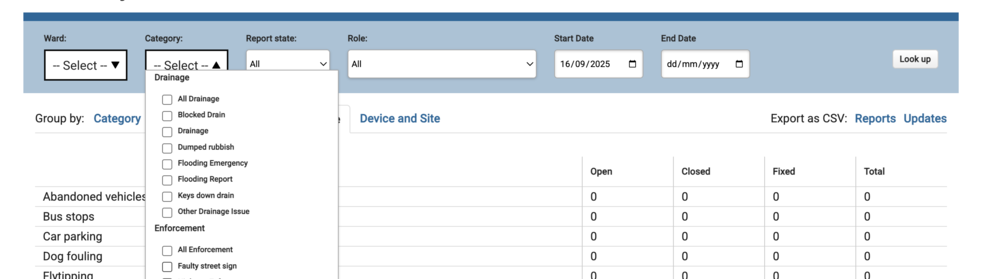
Viewing statistics
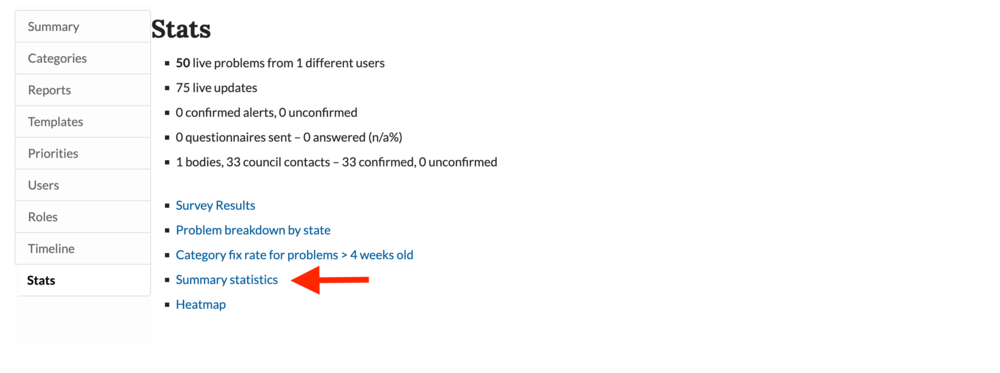
When you log in to the ‘Admin’ area and click ‘Stats’ in the admin navigation, you’ll see some top-level statistics, including the number of reports published on the site, the number of updates, and the number of alerts set up. This can be useful for a quick snapshot of activity.
For a more detailed breakdown, visit the stats dashboard. This can be accessed by going to “Summary statistics” from the admin stats page, or by typing ‘/dashboard’ on the end of your FixMyStreet url. You will need the View Dashboard permission to access this.
From here, you can access statistics on:
- All reports made across the council area
- Reports made within any specific ward or wards
- Reports made within any specific category
- Reports made between specific dates
- Reports that have a specific status, eg ‘open’ or ‘fixed’
- A combination of the above.
You can also group the results by:
- Category
- State
- Category and state
- Month
- Device (this allows you to see how many people access your site via the website, via an Android device or via an iOS device).
When grouping by category, you may select to group them by their parent category (you’ll see an option to select ‘All [category]’ at the top of the checkbox list under each parent category) or by selecting multiple categories at once via their individual checkboxes.
Exporting data
Report statistics can be downloaded as a CSV document, suitable for use in a spreadsheet program such as Excel or your own reporting tools.
You may refine the data included in an export using the fields at the top of the “Summary statistics” page, and then selecting “Export as CSV”, choosing to export either the Reports themselves or their Updates.

In order to be performant, data is pre-generated overnight ready for export, so it’s worth noting the CSV export won’t include information from the current day.
Exports can also be customised according to the requirements of individual clients - please contact us to discuss any non standard export requirements.
Importing dashboard data automatically
You may wish to automatically import data from the dashboard into your system on a regular basis. Once you set your chosen criteria on the dashboard page, make a note of the URL of the “Reports” or “Updates” link in the “Export as CSV” section. Then you should generate an access token by visiting your account page and then “Security” and generating a token from there.
You can then specify that token either by appending it to the URL as an access_token parameter,
or including it as an Authorization: Bearer <token> HTTP header in the request from your system.
The export must be present in the URL, and controls how the CSV is generated.
Reports can take some time to generate, so there are two different values for the parameter:
export=1: the response will wait until the file is ready and then provide itexport=2(the default): you will immediately get a 202 HTTP response with a redirect to the location where the file will be once it has finished processing. This is more robust.
Heatmap
Also accessible from the admin stats page is our heatmap. This can provide an overview of reporting in your area, filtered by state, category, or ward, for a particular date range:

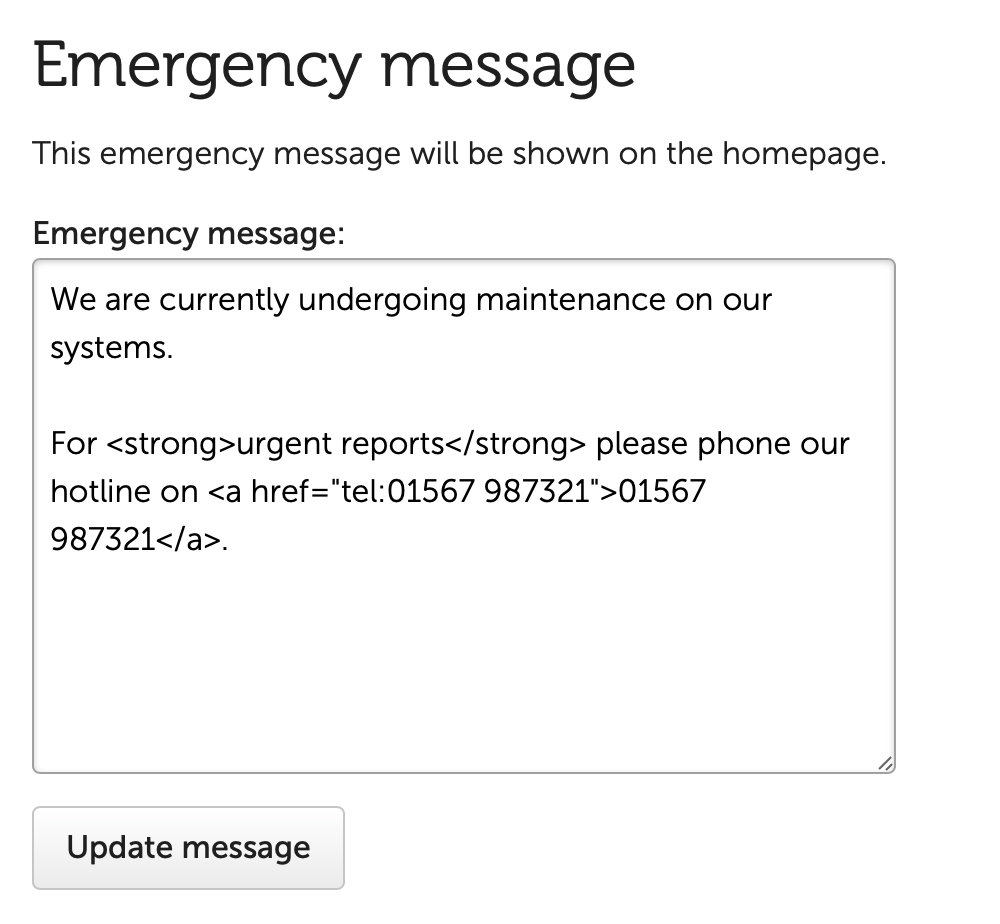
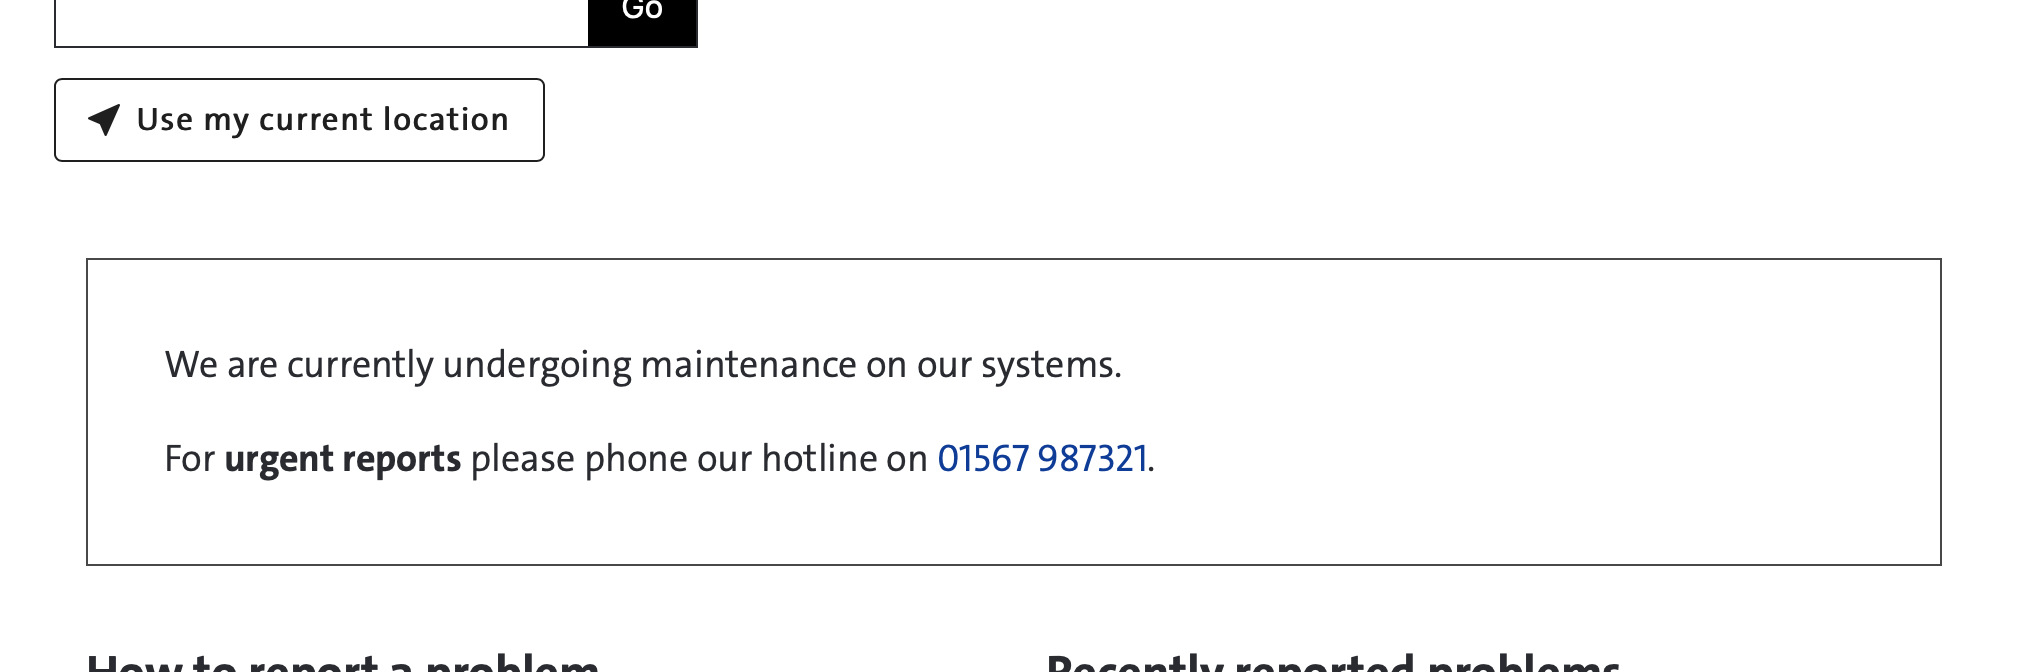
Displaying a site message
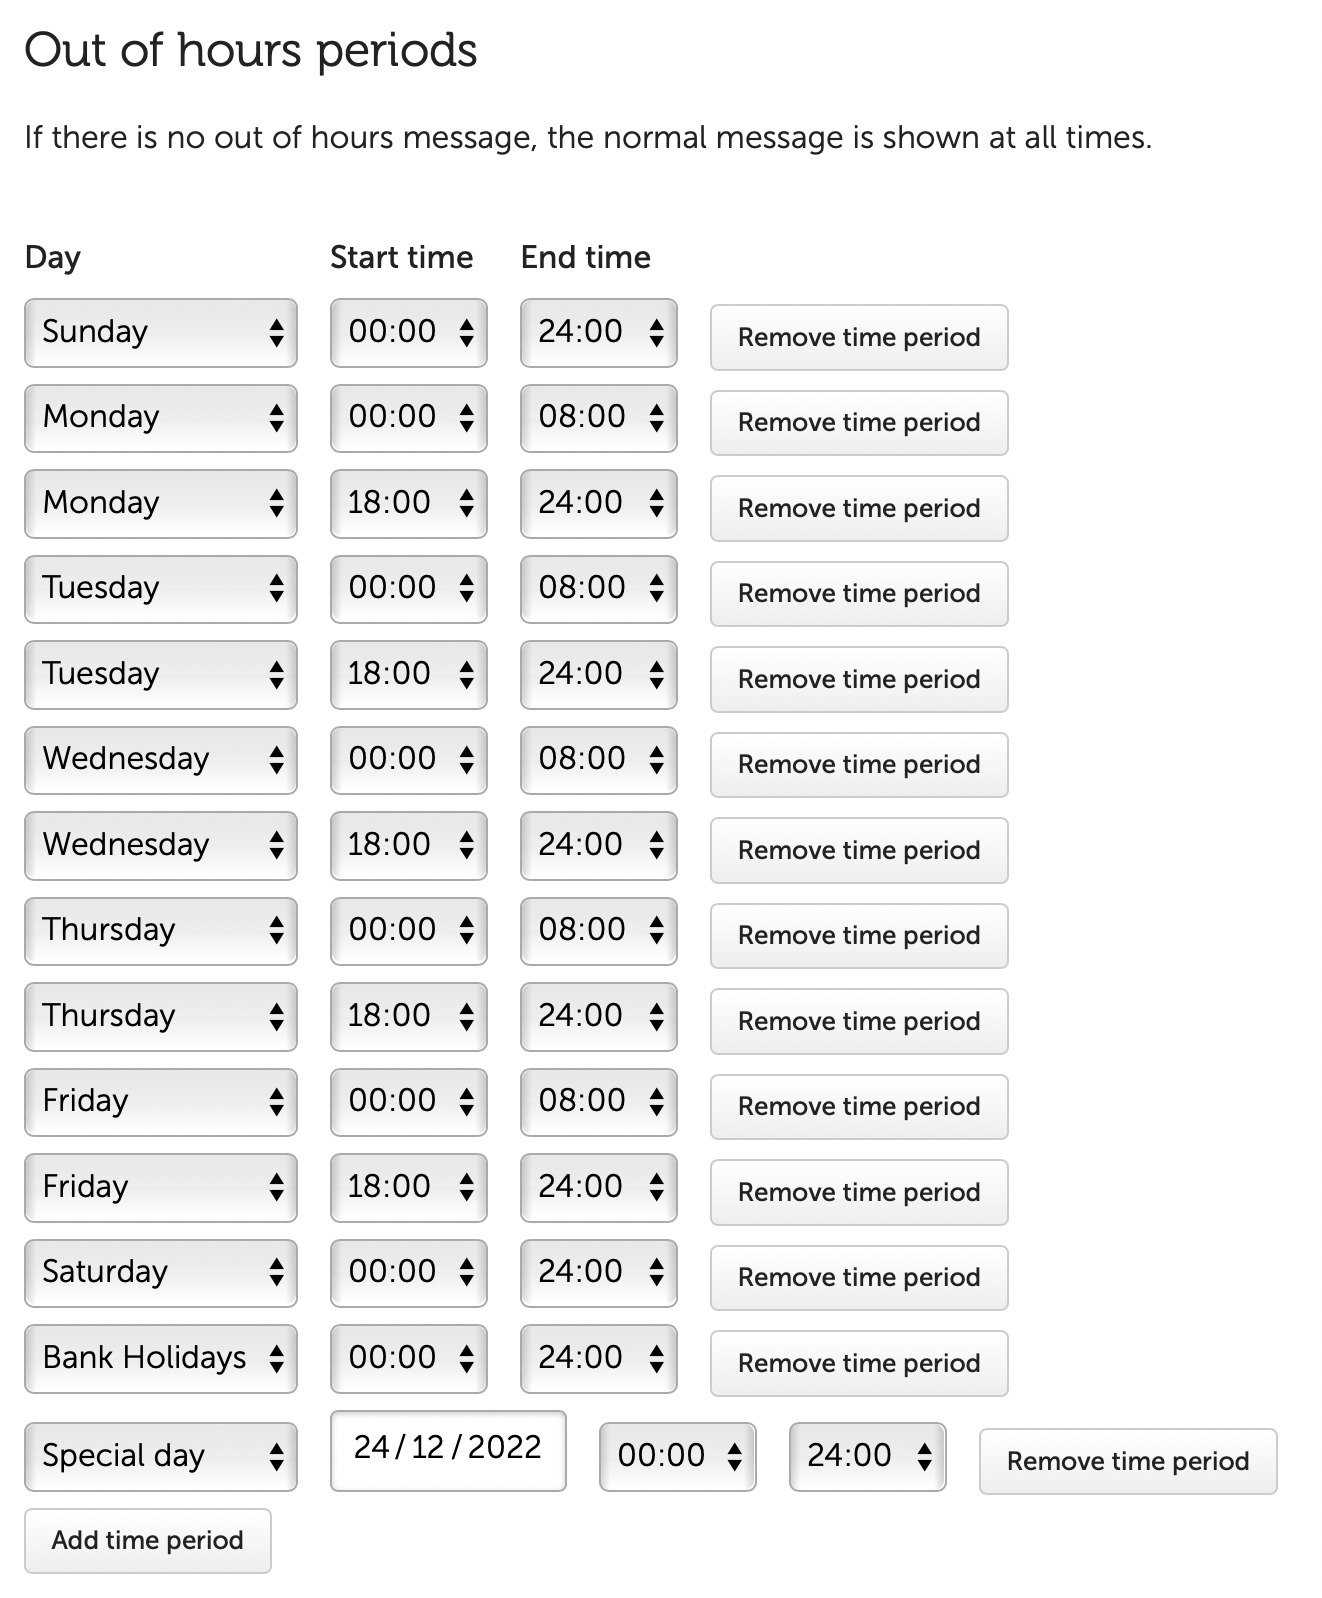
This feature allows you to set site messages which will be displayed on the homepage or reporting pages; you can have different messages for in/out of hours.
Certain HTML tags can be used for formatting purposes. These are limited to the same set as described
in “HTML content in notices”. You should not use block-level HTML elements
(e.g. div,p, etc) in the input field, as linebreaks are automatically converted to HTML tags. If
you want multiple paragraphs they should be separated with blank lines as in the below example.
To clear the message simply delete any contents in the box.
You can set the time periods that will count as out of hours on the same page. For example, if your out of hours were 6pm to 8am Monday to Friday, all day weekends and Bank Holidays, plus Christmas Eve, you would set it up as the following screenshot: